How To
In this section you can learn how to do anything in MORe. This section includes help, tutorials, tips and how-to guides for MORe.
General Information
Create an account
 Complete the mandatory fields in the registration form:
- Username
- Password
- Password verification; type in the same password you previously use
- Name
- E-mail address
- Institution, from a dropdown list
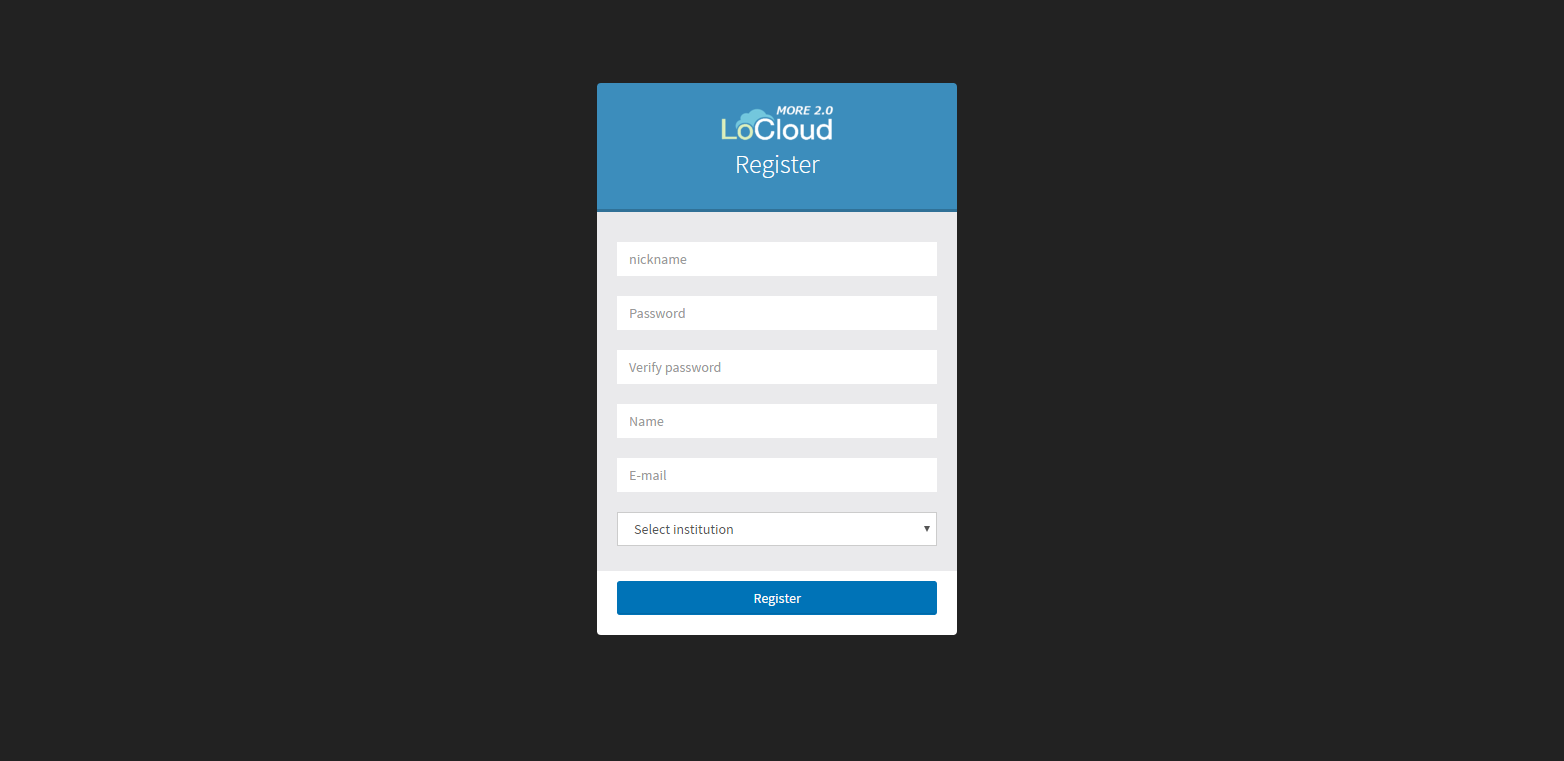
Once your registration is complete, you will receive an e-mail which will contain a link. For the activation of your account please follow that particular link.
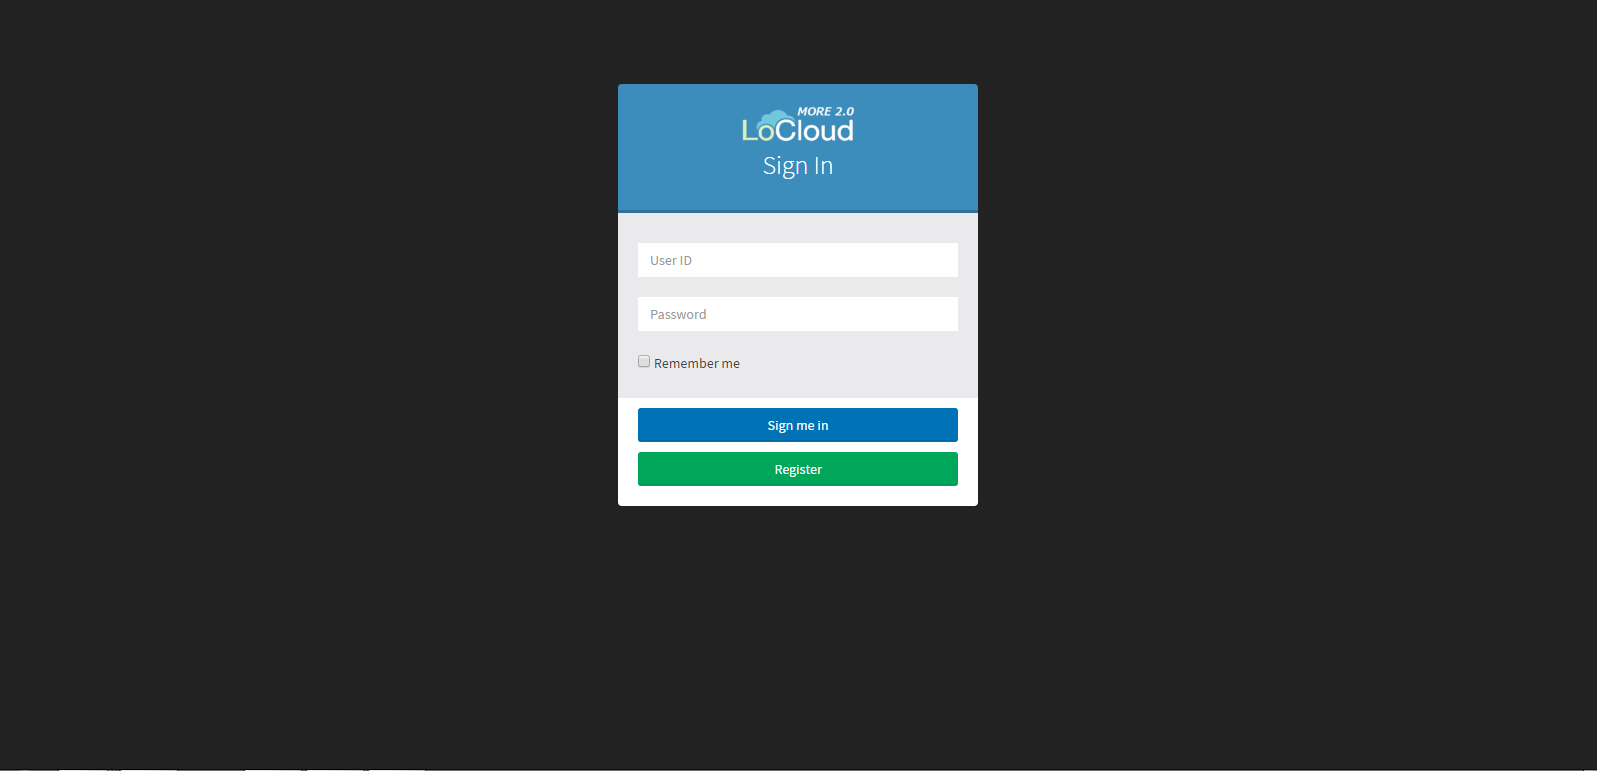
Login to System
In the main login page fill in your username and password.
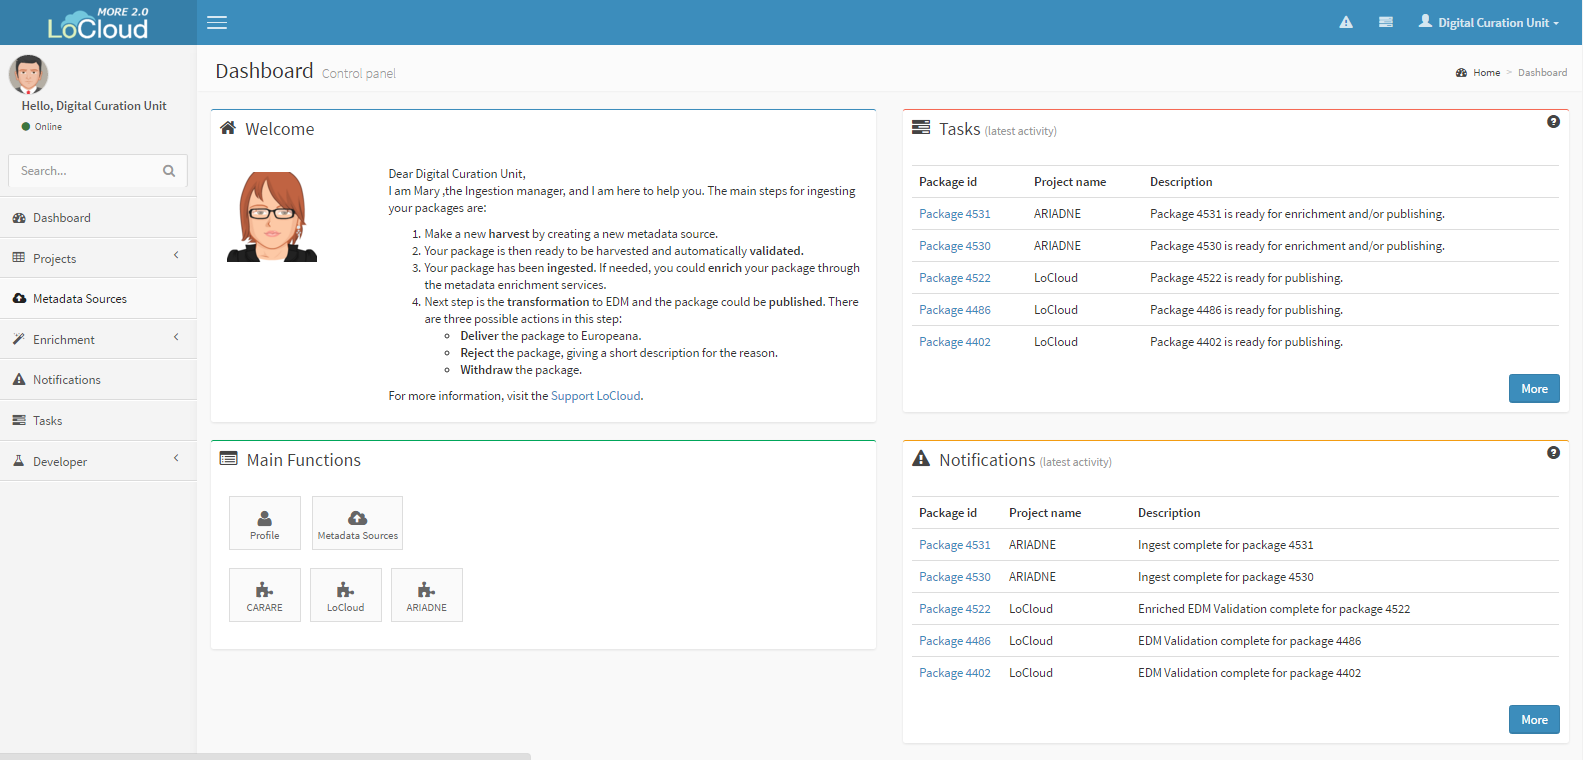
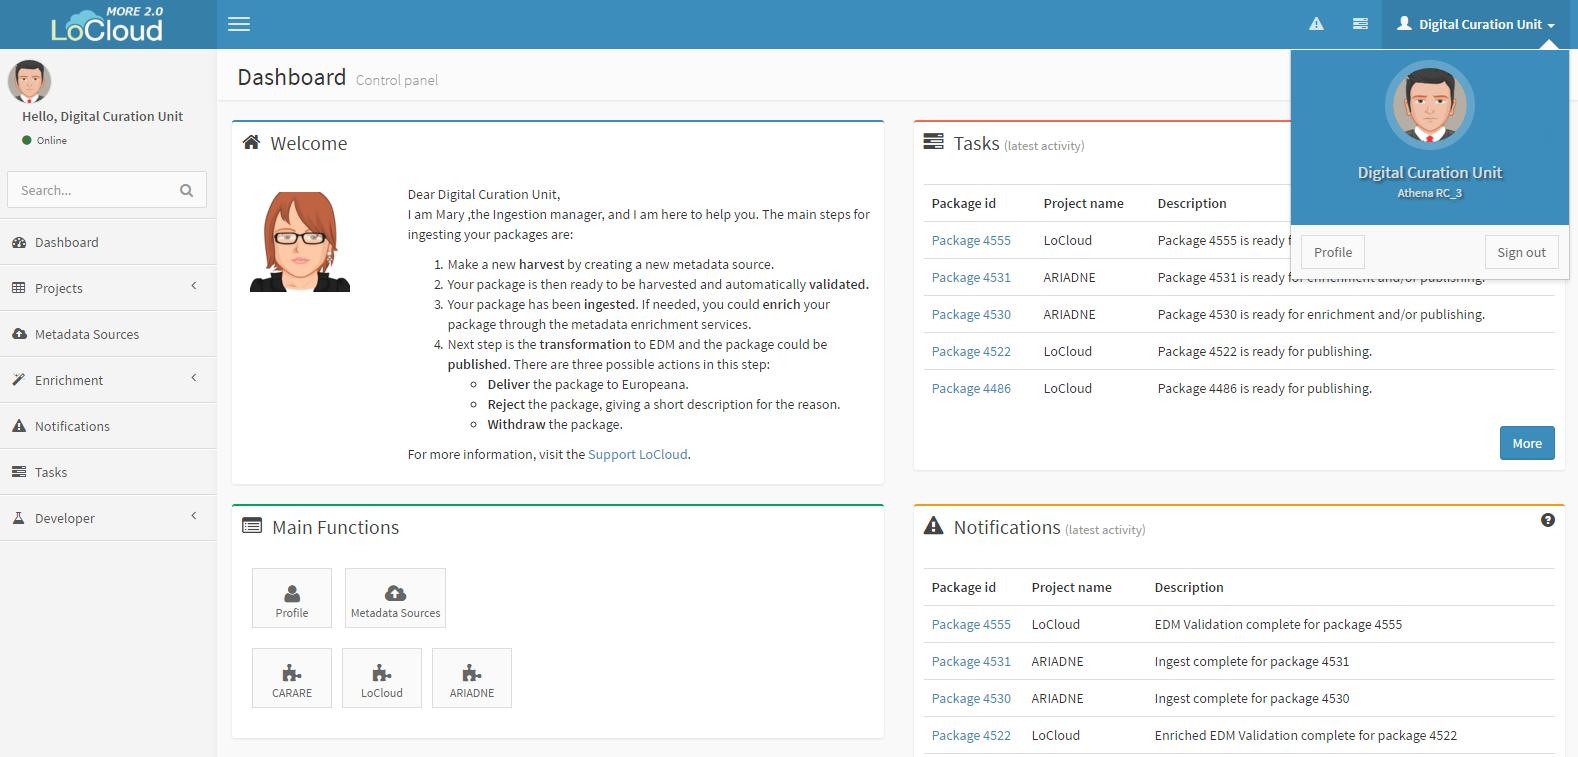
After logging into, the main Dashboard with the four main widgets appears.
- Top Left: Welcome message and brief explanation of the workflow.
- Top Right: Tasks assignments. You do not have to remember what to do next. Whenever you must do something new, a task assignment will be in the task section with the appropriate description.
- Bottom Left: Main functions; this can change depending on your credentials. It contains links to your profile, metadata sources and projects.
- Bottom Right: Notifications. In the notification panel whenever a job finishes or fails you will receive a notification about it. The notification is accompanied by an appropriate description in order to fully understand which job was successfully completed or what went wrong and the job failed respectively.
Sign out
Select the button in the top right; in which the user icon accompanied by the name of the particular user is depicted. Then, in the pop up panel just select the "Sign out" button.
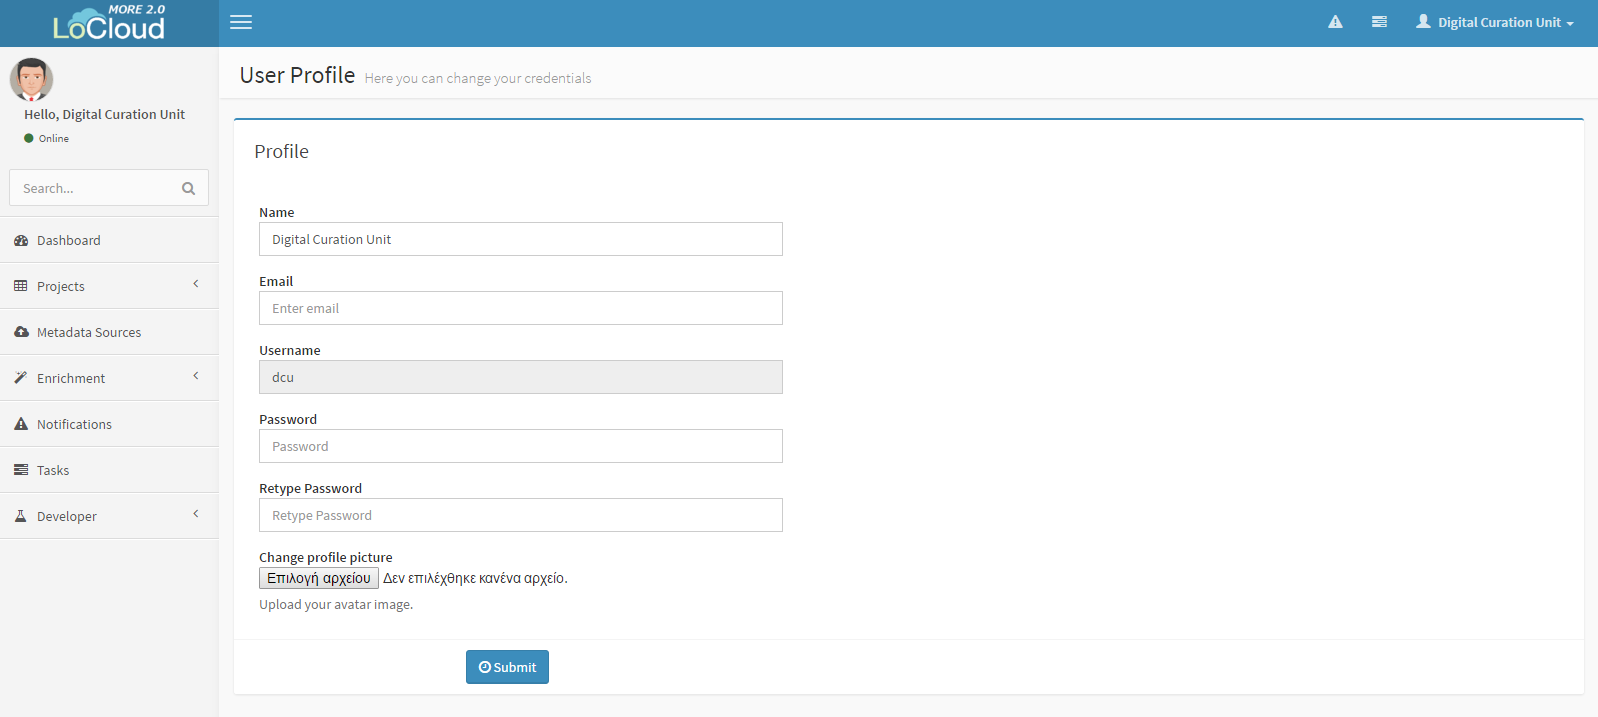
Profile
Manage your Profile
There are two different ways for you if you wish to be transferred in your profile management page:
- In the "Main Functions" panel (bottom left in the main dashboard) select the "Profile" button.
- Select the button in the top right; in which the user icon accompanied by the name of the particular user is depicted. Then, in the pop up panel select the "Profile" button.
Here you can change some features of your profile such as the name, e-mail address, password and profile picture. In order to save the changes you have to submit the form. Please note that if you do not submit the form, none of the changes will be saved.
Notifications
Whenever a job (package creation, harvest, validation, ingestion, transformation, enrichment, publication, withdrawal and rejection) finishes or fails you will receive a notification.
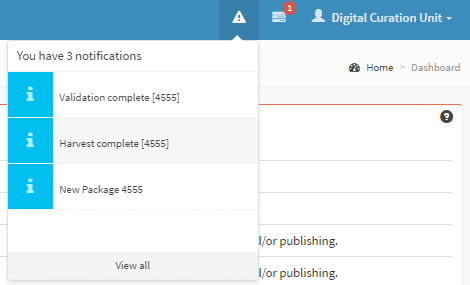
In the Notifications panel of the main Dashboard the latest notification you have received are available. To see all the notification you have received, you can either press the “More” button in the Notifications panel or select the “Notifications” button in the menu on your left.
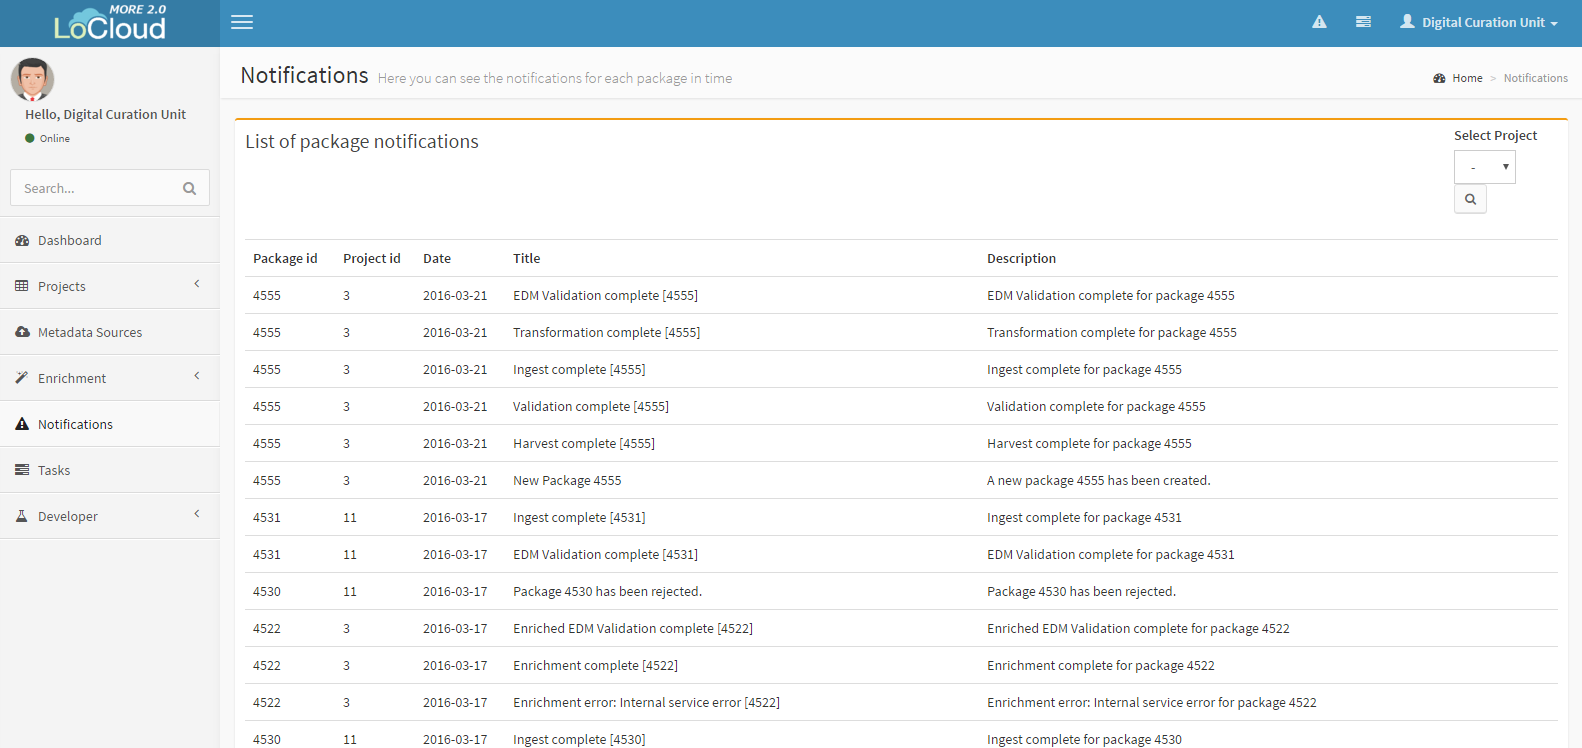
A list of all the notifications ever received. For each notification, the information shown below is provided:
- Package ID: The unique identifier of the package.
- Projectd ID: The unique identifier of the project.
- Date: The creation date of the notification.
- Title: A small title for the notification.
- Description: A brief explanation for the notification.
Tasks
Whenever you are assigned a new task (harvest, ingest, transform, enrich and publish package), you will automatically receive a notification.
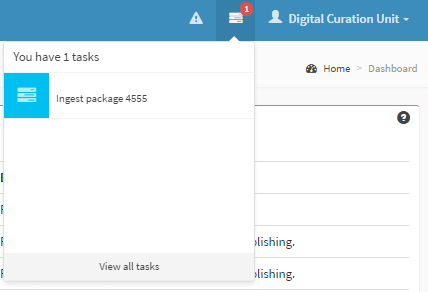
In the Tasks panel of the main Dashboard the latest tasks you were assigned are available. To see all the tasks you were assigned, you can either press the “More” button in the Tasks panel or select the “Tasks” button in the menu on your left.
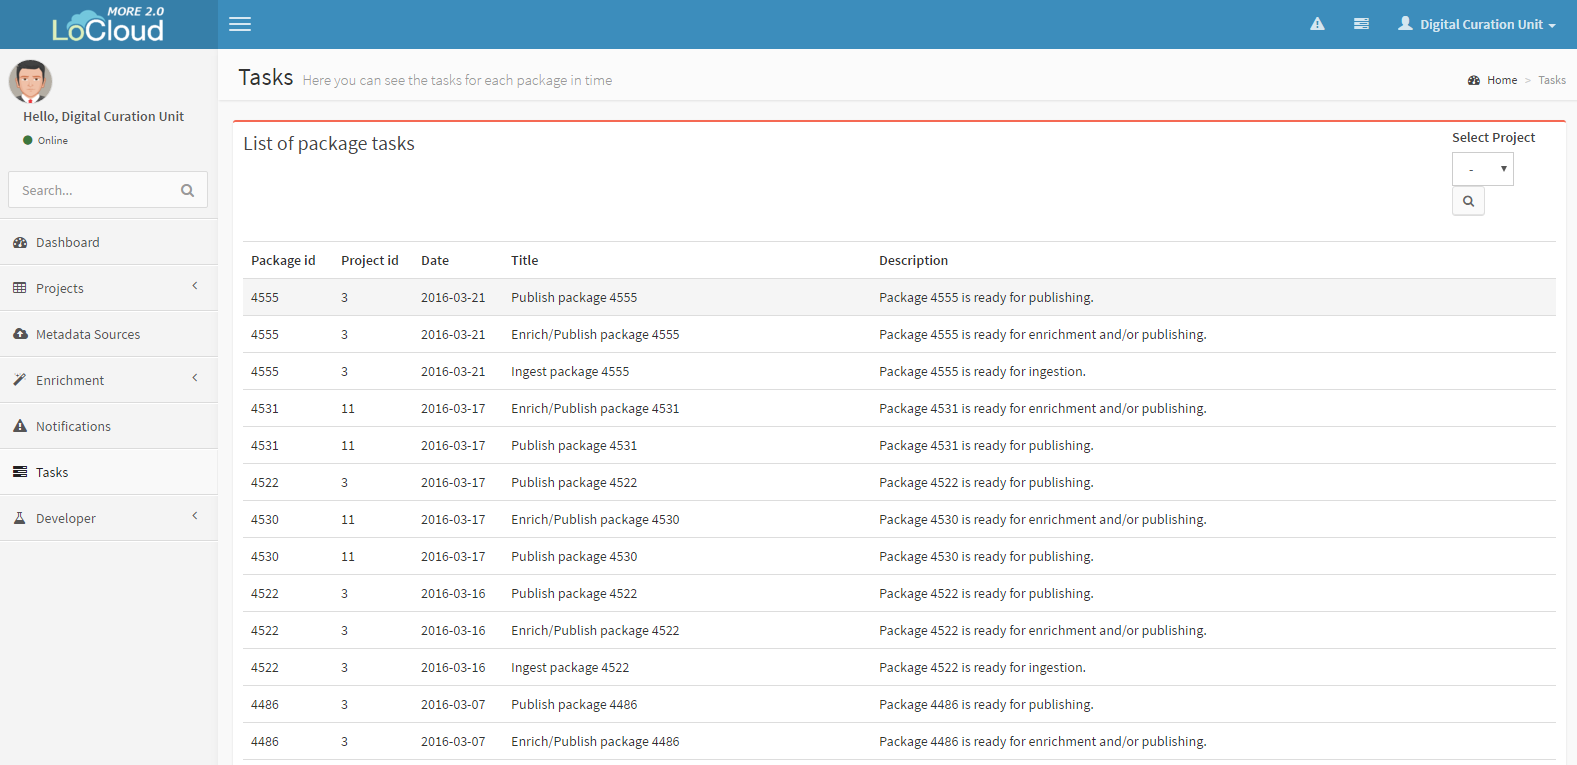
A list of all the tasks. For each task, the information shown below is provided:
- Package ID: The unique identifier of the package.
- Projectd ID: The unique identifier of the project.
- Date: The creation date of the task.
- Title: A small title for the task.
- Description: A brief explanation for the task.
Packages
Find a particular package
- You can find a particular package you are searching for, using the search bar on the top left; type in, the package id.
- Otherwise you can find the package you are currently searching for by selecting the tab “Projects” from the menu on the left. From the drop down list that appears select the appropriate project (the project in which you have assigned your package). At this point you can find the specific package in the respective tab of its current status; for instance, if the status of your package is ingested then select the “Ingested” tab. Finally, you simply have to select the package you were searching for.
- You also have the option to simply click on the package id whenever it appears (the id can appear in the “Notifications” and “Tasks” panels).
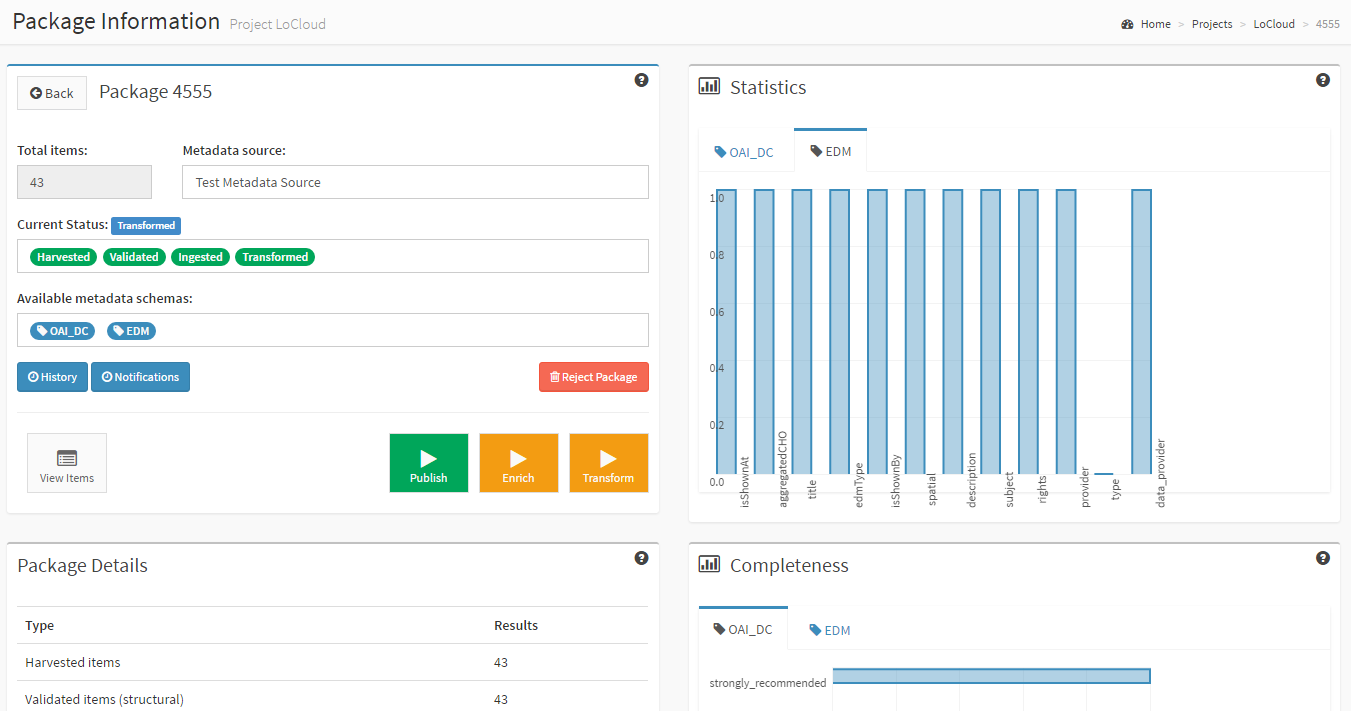
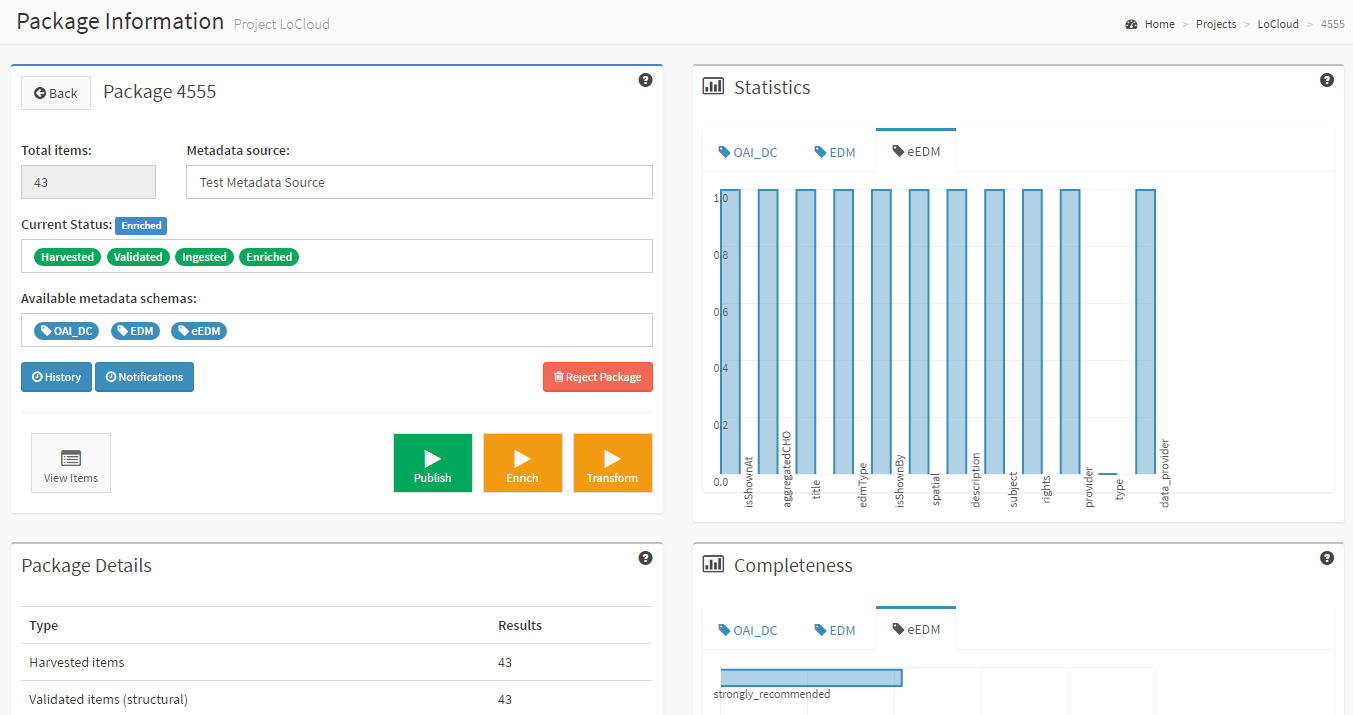
You can see information about your package
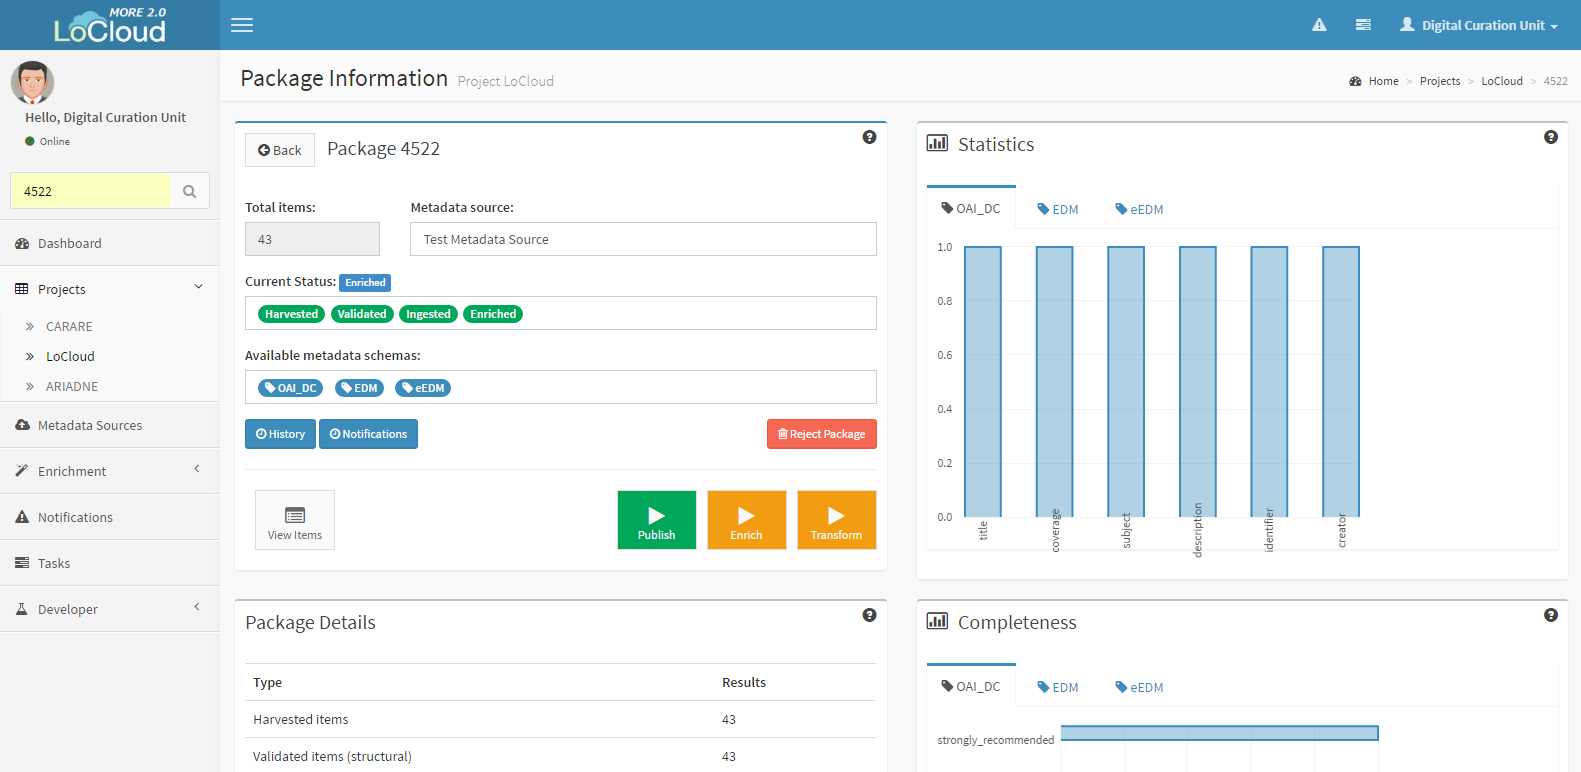
- the total number of items of the package
- the status of the package (harvested, validated, ingested, transformed or enriched, published) and the current status of it
- the metadata schema, included all the available metadata schemas of the package
- the metadata source, used for the harvesting
- the history of all the tasks that have been completed
- the noticiations appeared in the user during the whole workflow
- the items;
- statistics about the mandatory elements per schema (native, EDM, enrichedEDM)
- package details, which refer to the harvested, the validated, the transformed and the enriched items
- completeness about the mandatory and the strongly recommended elements per schema (native, EDM, enrichedEDM)
Additionally, the user can be informed about:
- thematic information, including all the subjects that appear to the records
- spatial information, indicating in the map the points that the records refer to
- temporal information, including all the dates/periods that appear to the records
History
You can easily follow the history of any package. To see the history of a specific package (when it was harvested, transformed, enriched or published), just click on the "History" button.

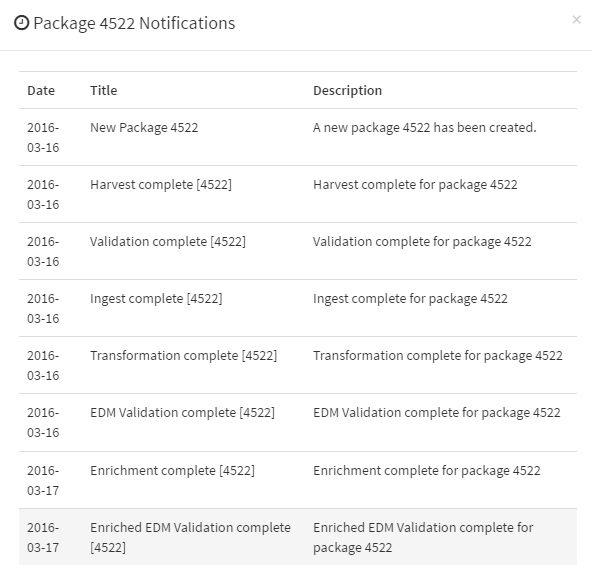
Notifications
To see all the notifications you have received for a specific package, click on the “Notifications” button. Notifications can inform you about the current status of the package.
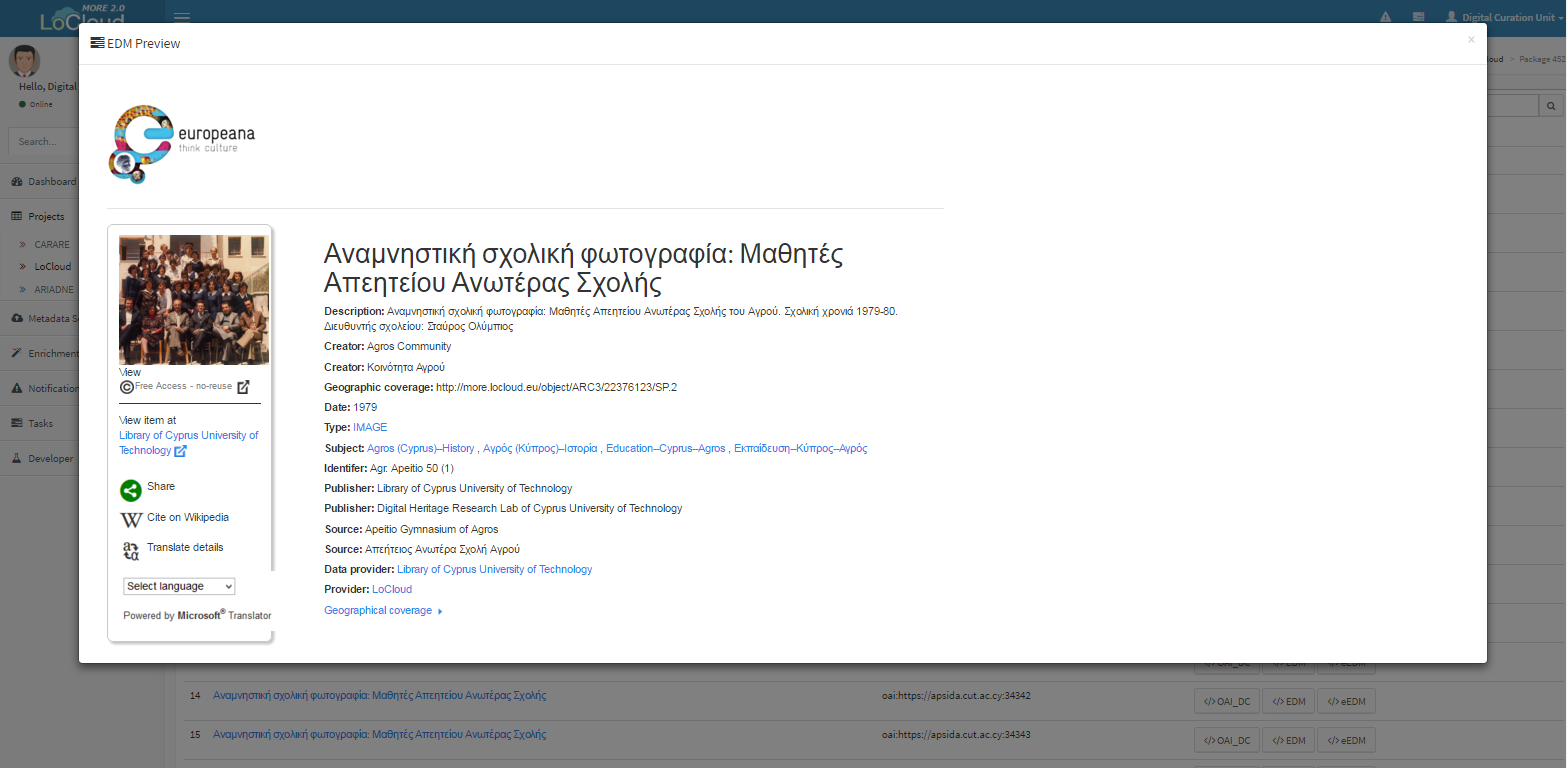
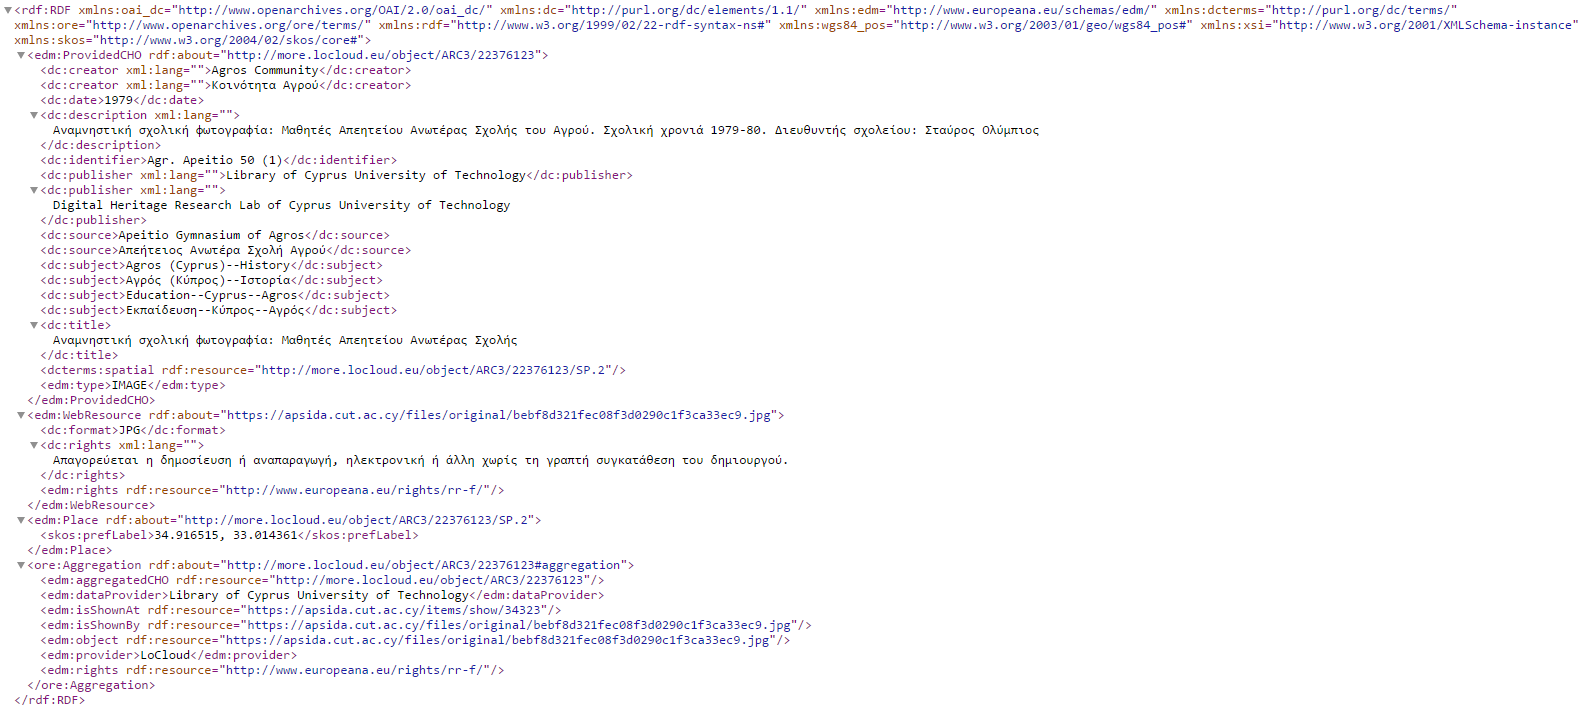
View Items
You are able to see a list of the items of the package, choosing the button "View items". This list contains information about the name of the item (label), the native id, the native schema, the EDM and the enriched EDM. In detail, if your package has been transformed, you will notice that for each item of the package there are two records one in the native metadata schema and on in EDM. Additionally, if you have enrich the package, records in enriched EDM schema will also be available.
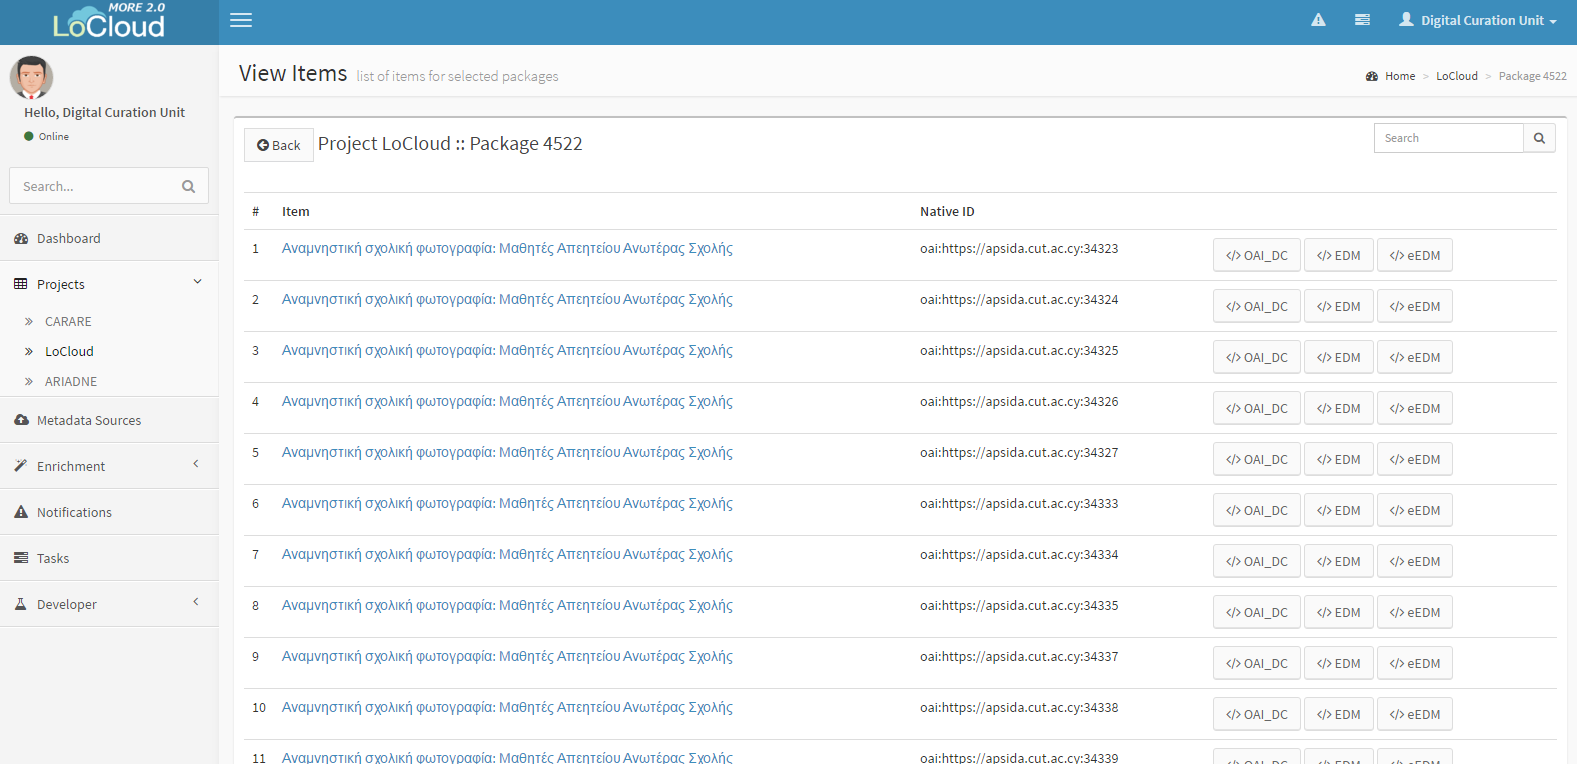
Click on the item in order to view it or click on one of the available metadata schemas to take a closer look on the content of the respective record.
Important Note: You are not able to see the content of the items until the ingestion is completed. Once the ingestion has been completed, you will be able to see the content of the records (in their native metadata schema). Until then, the only information you will be given is the native id.
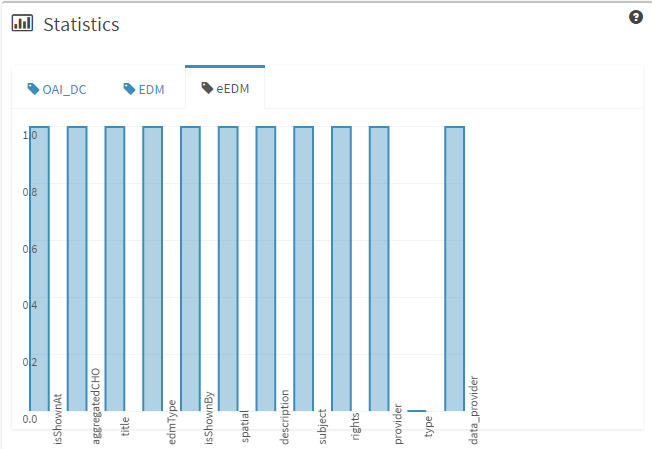
Statistics
The Statistics panel shows the percentage of items that are either mandatory or strongly recommended per schema. In the horizontal bar the various types of metadata elements are shown while in the vertical bar the percentage of items (in the specific package) containing this information is shown. Moreover, there can be more than one available tabs; you can have from one, up to three different tabs (native metadata schema, EDM, eEDM). This panel is available with the completion of the harvest/validation.
Completeness
The Completeness panel shows the completeness levels (percentages) for the mandatory and strongly recommended elements of this schema. This percentage refers to the average number of mandatory and recommended elements for all the items of the package. Moreover, there can be more than one available tabs; you can have from one, up to three different tabs (native metadata schema, EDM, eEDM). This panel is available with the completion of the harvest/validation.

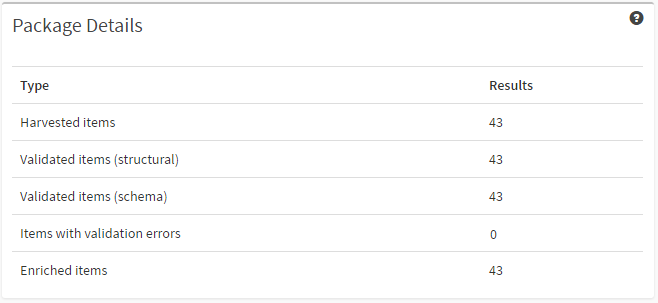
Package Details
The Package Details panel shows the details of the specific package. Information about the harvested items, the validated items (both for structural and schema validation), the transformed and finally the enriched items are given to the user. This panel is available with the completion of the harvest/validation.
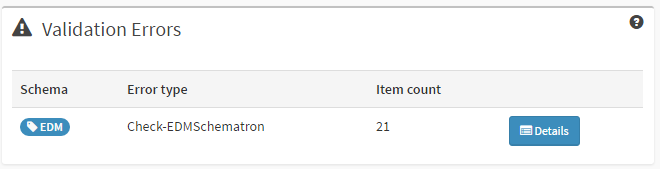
Validation Errors
This panel shows the details of the validation errors after transformation and/or enrichment. The errors appear per schema and you can see them from “Details”. Each error corresponds to one item (item id) and all these errors make the records invalid for harvesting to Europeana.

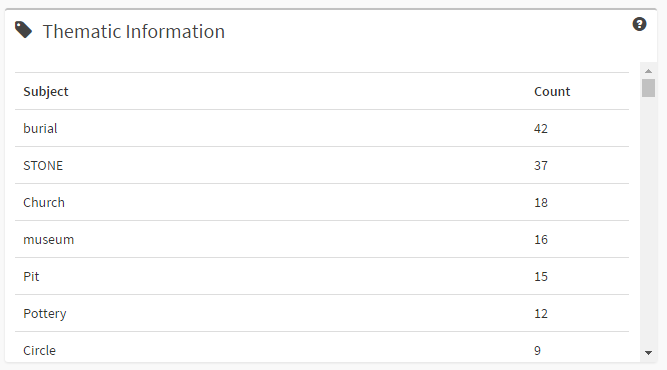
Thematic Information
This panel shows the details of the subjects of the package. These subjects refer to the items of the specific package and the user can browse through them. In particular, in this panel you can see the number of times that the subjects on the left, are appearing in the records of the package.
Spatial Information
This panel shows the details of the spatial information of a package. The user can navigate to the map and see the points that the records of the package are located.

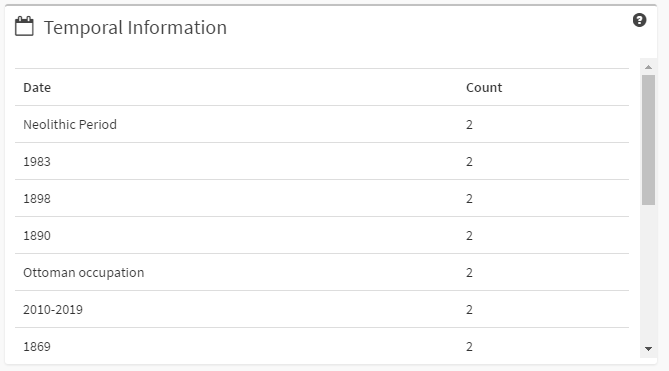
Temporal Information
This panel shows the details of the temporal information of the package. These dates refer to the items of the specific package and the user can browse through them.
Metadata Source
General
There are two different ways for you to see the available metadata sources:
- In the "Main Functions" panel (bottom left in the main dashboard) select the "Meatadata Sources" button.
- In the left menu, select the "Metadata Sources" tab.
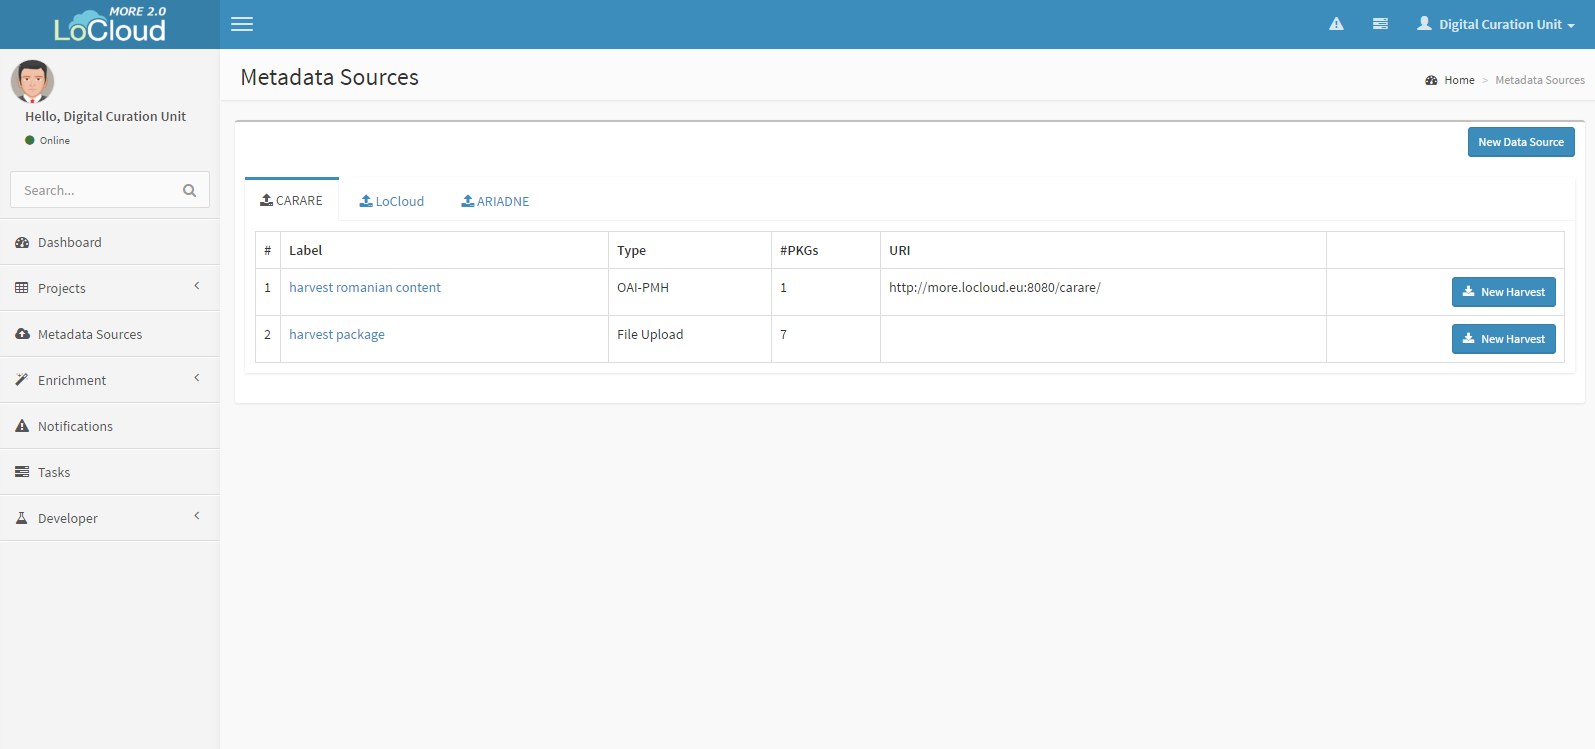
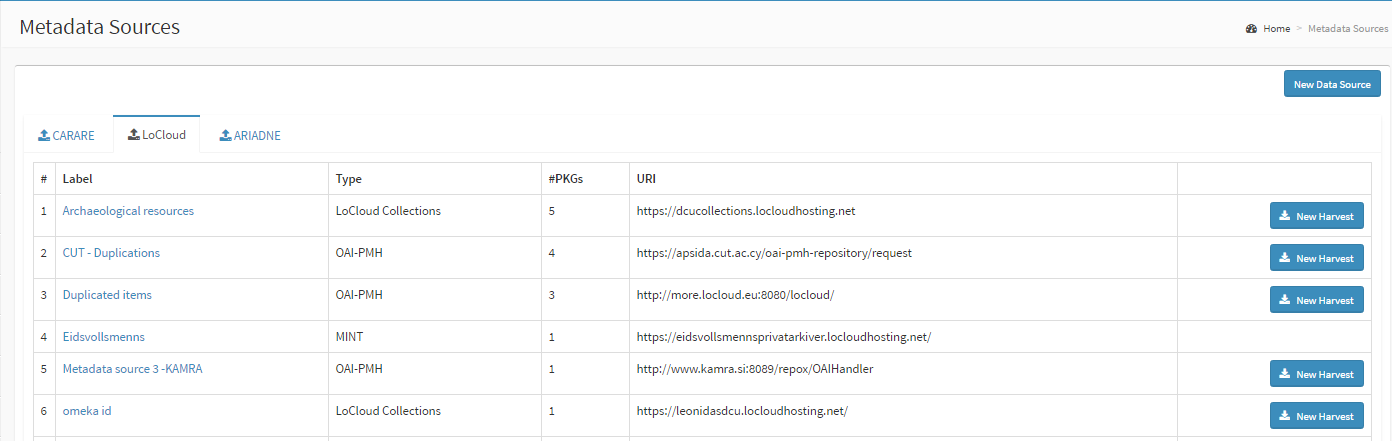
Browsing through the project tabs we can see the respective metadata sources of each project. The projects which are available for a particular user change depending on the projects he/she is part of. In our case the user is part of CARARE, LoCloud and ARIADNE projects and therefore three tabs are available.
Moreover, in each tab the metadata sources appear in a list in which is shown:
- the label of the metadata source
- the type/source of data
- the number of times it has been harvested
- the uri
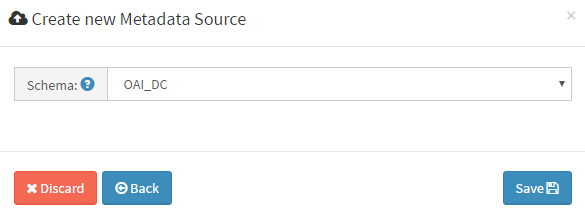
Create a new metadata source
The first step for the harvesting task is to create a metadata source, through the tab "Metadata sources" in the left menu.
After this, you have to choose the button "New Data Source". Please, fill in the empty fields.
You have to provide the necessary information:
- The appropriate type/source of data.
- The project that the particular metadata source will belong to.
- The label of the new metadata source.
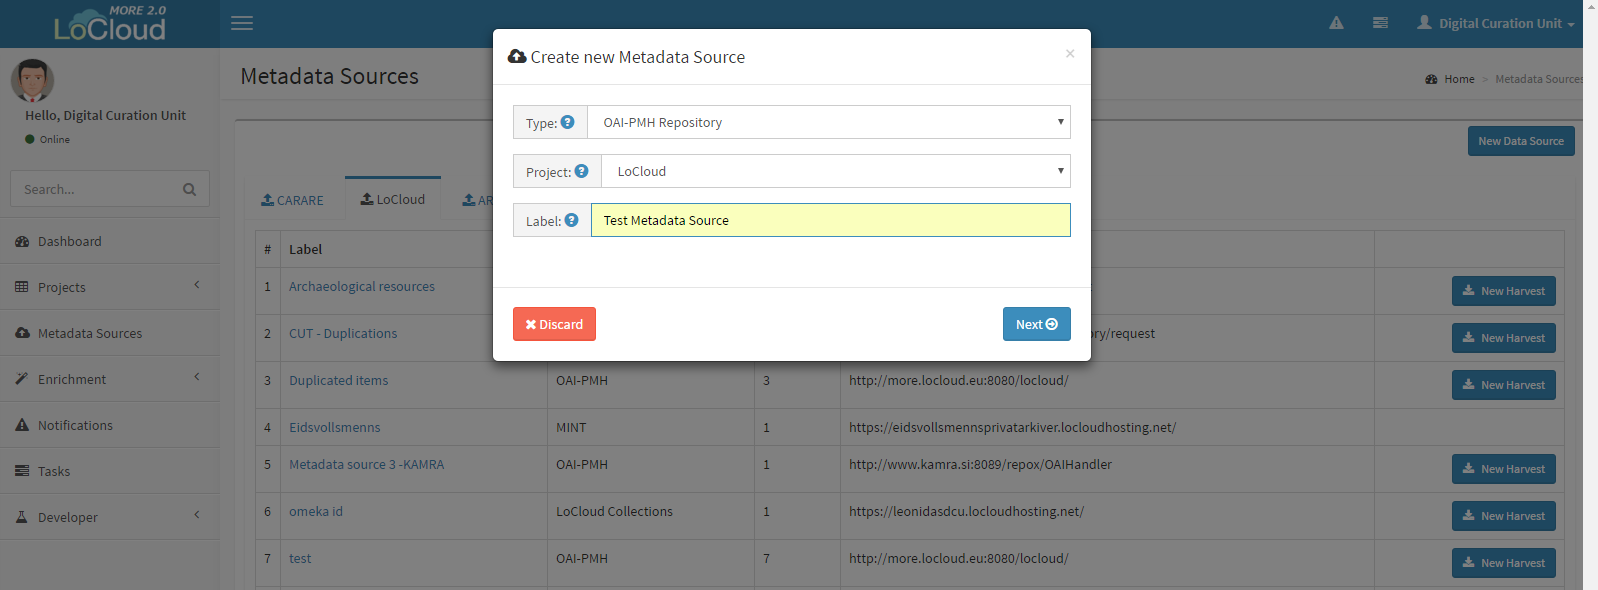
Subsequently, choose the button "Next" so as to fill in some more fields.
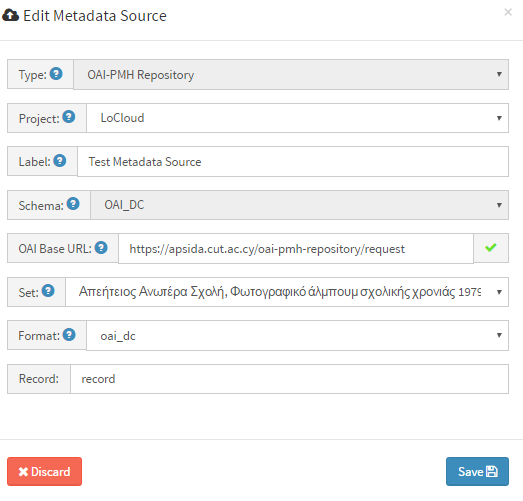
In the case of OAI-PMH Repository and LoCloud:
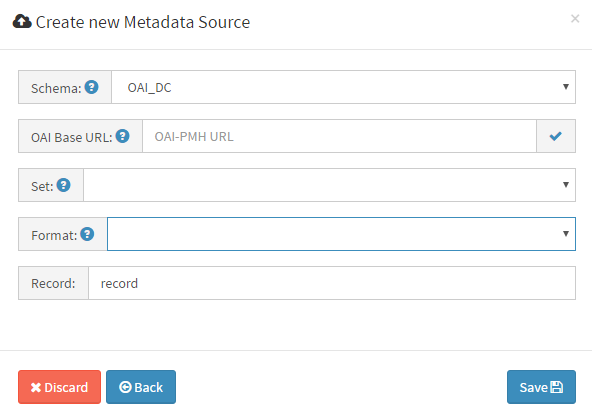
- The source metadata schema.
- The URL; OAI URL in our case without any request statement. The user after inserting the url should validate it through

- The set we are going to provide for harvesting.
- The format that correspond to the above set/collection.
- Record, OAI record element which takes the value 'record'.
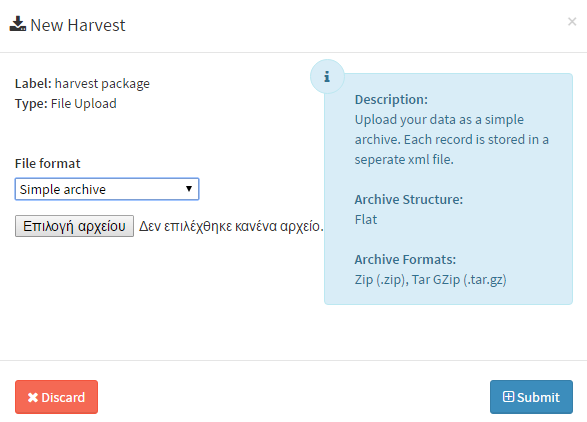
In the case of File Upload:
- The source metadata schema.
Edit a metadata source
You are able to edit a metadata source by simply choosing it from the list. After any changes do not forget to save the form, in order to make the changes permanent.
Harvest
Create a new harvest
Harvesting can be done through 2 different ways:
-
After creating the Metadata Source, you can select the button "New harvest".
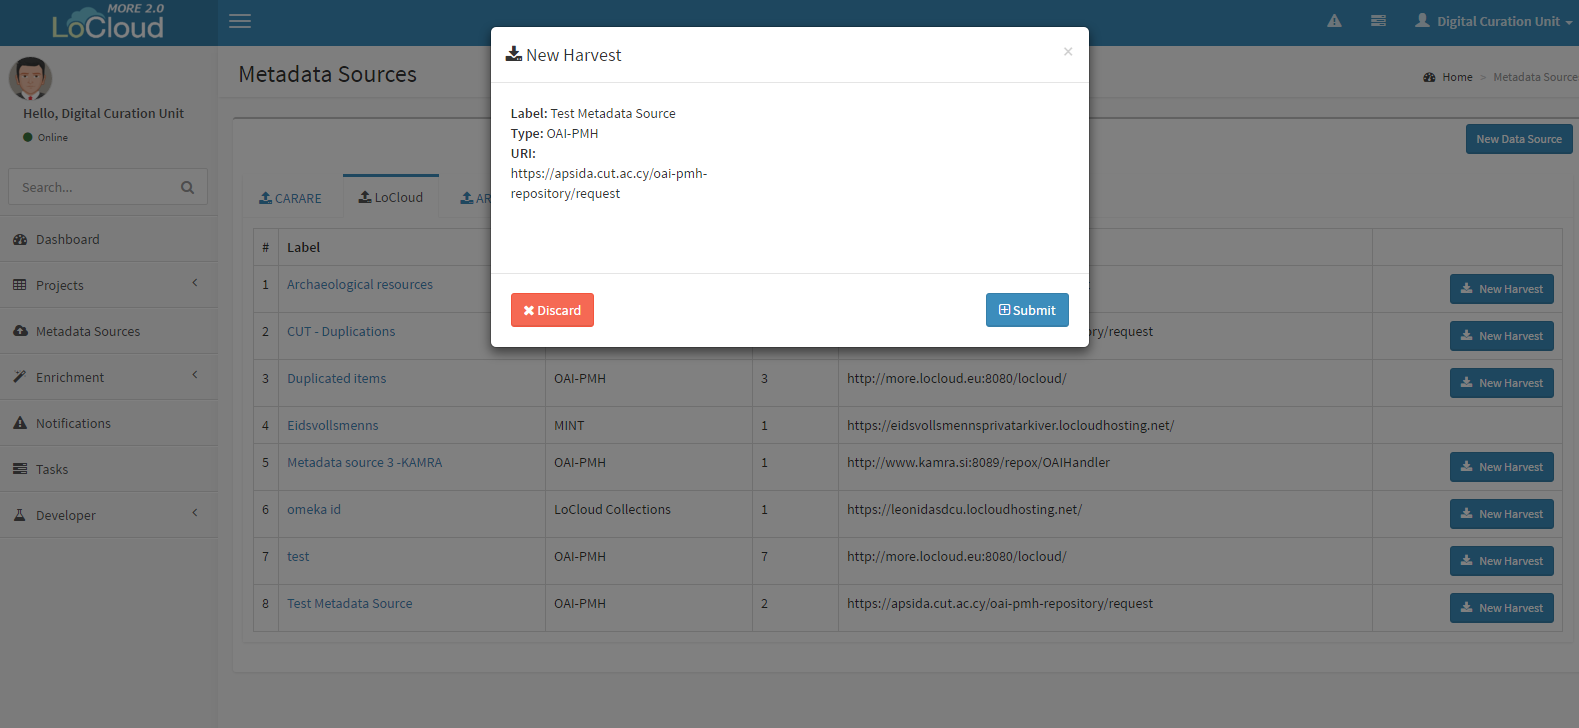
-
From the tab "Projects" in the left menu, you can choose the project that intends to publish the dataset, choose the button "New harvest", select the appropriate metadata source and submit the form.
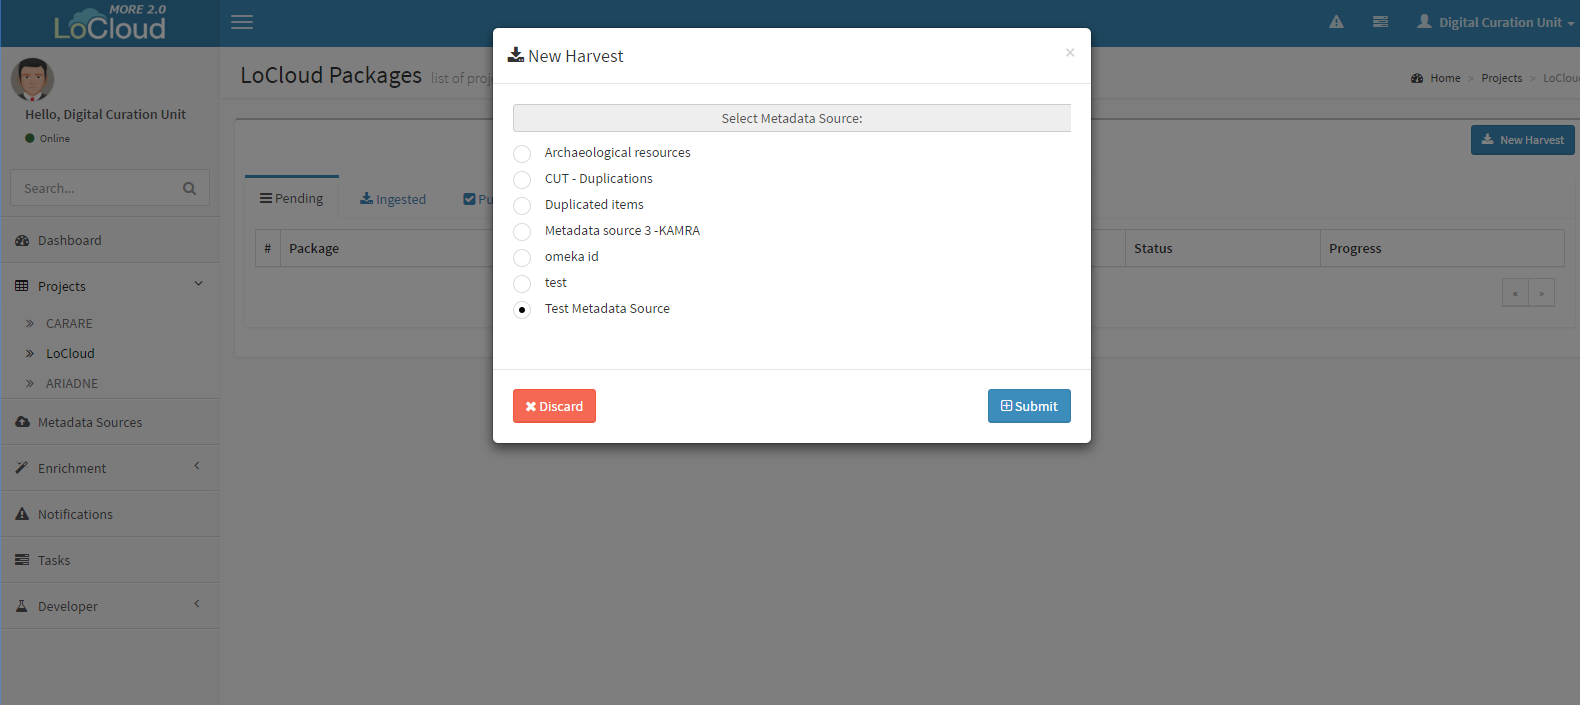
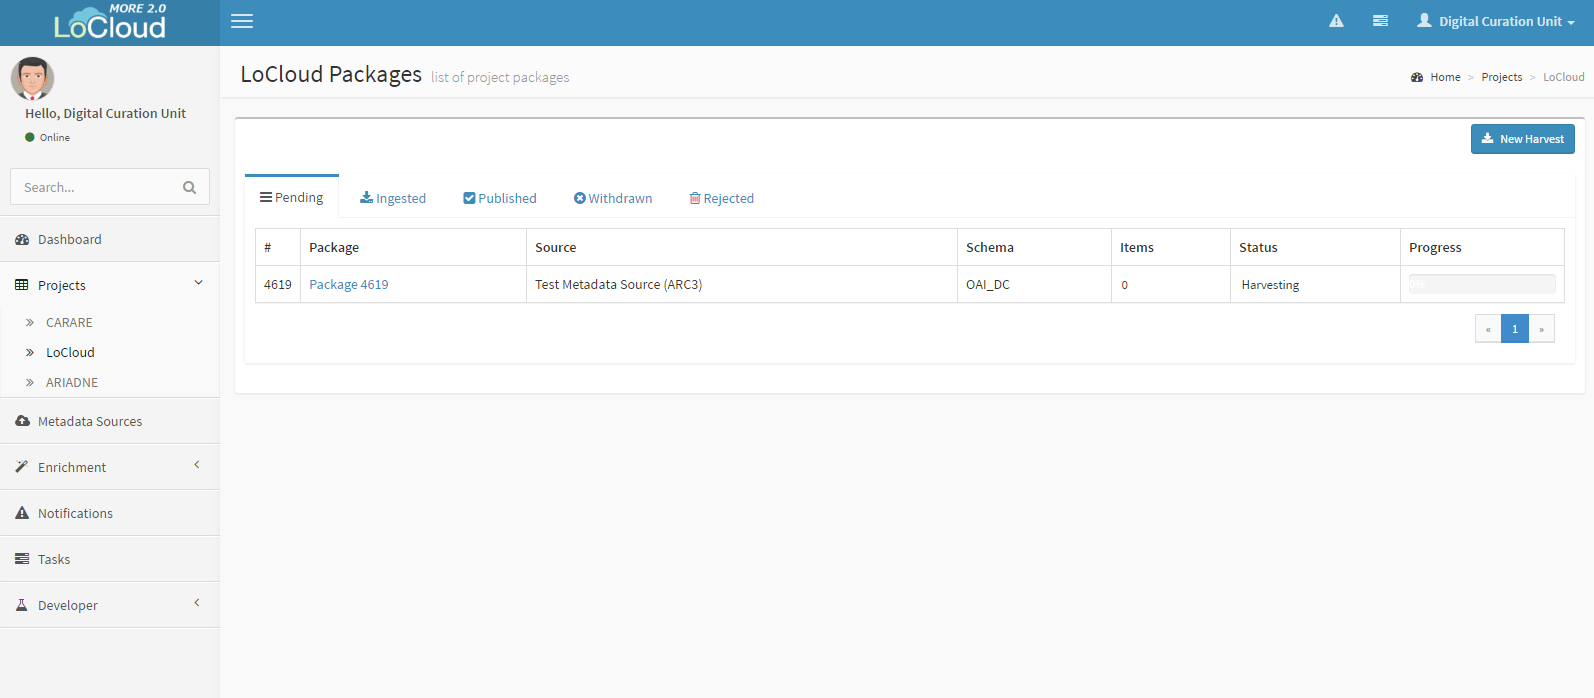
After submitting the form, a new package id is created. The package is received and validated, so as the harvesting to be completed. The user is able to see all the packages in a list, as it is shown below. This list describes the package id, the metadata source, the schema used in the source, the number of items that it contains, the status and the progress. In the image below there are no items, as the harvest has not finished yet.
Additional Requirements and limitations
Depending on the type of the source, you may have to provide some additional information or you might encounter some restrictions. In particular:
-
If your metadata source is of type File Upload then when you are about to make a new harvest, you will be requested to upload your data as a simple archive.
-
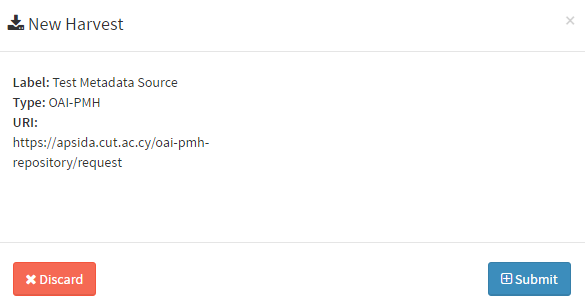
If your metadata source is of type OAI-PMH then you simply have to submit the form.
-
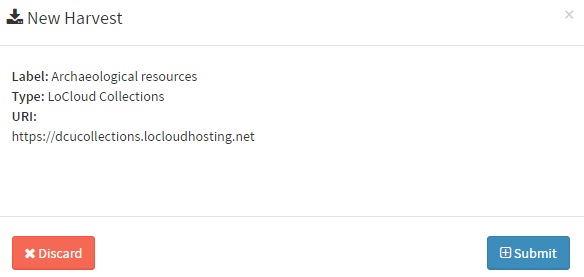
If your metadata source is of type LoCloud then you simply have to submit the form.
-
You cannot create a new harvest if the type of the source is MINT (in the image below, you can notice that in the case of MINT the option to create a new harvest is missing). This happens because MINT undertakes the procedure of creating the source and publishing it to MORe. When the user makes a publication through MINT, then a metadata source is automatically created. Once the source has been published to MORe, you can find a new package in the Pending area of the project in which you assigned the source. At this point, you can manage this particular package without any restrictions/ limitations.

After Harvest
Next step is the ingestion of the package. Important note: You cannot see the content of the items before the completion of the ingestion.
Ingest
General
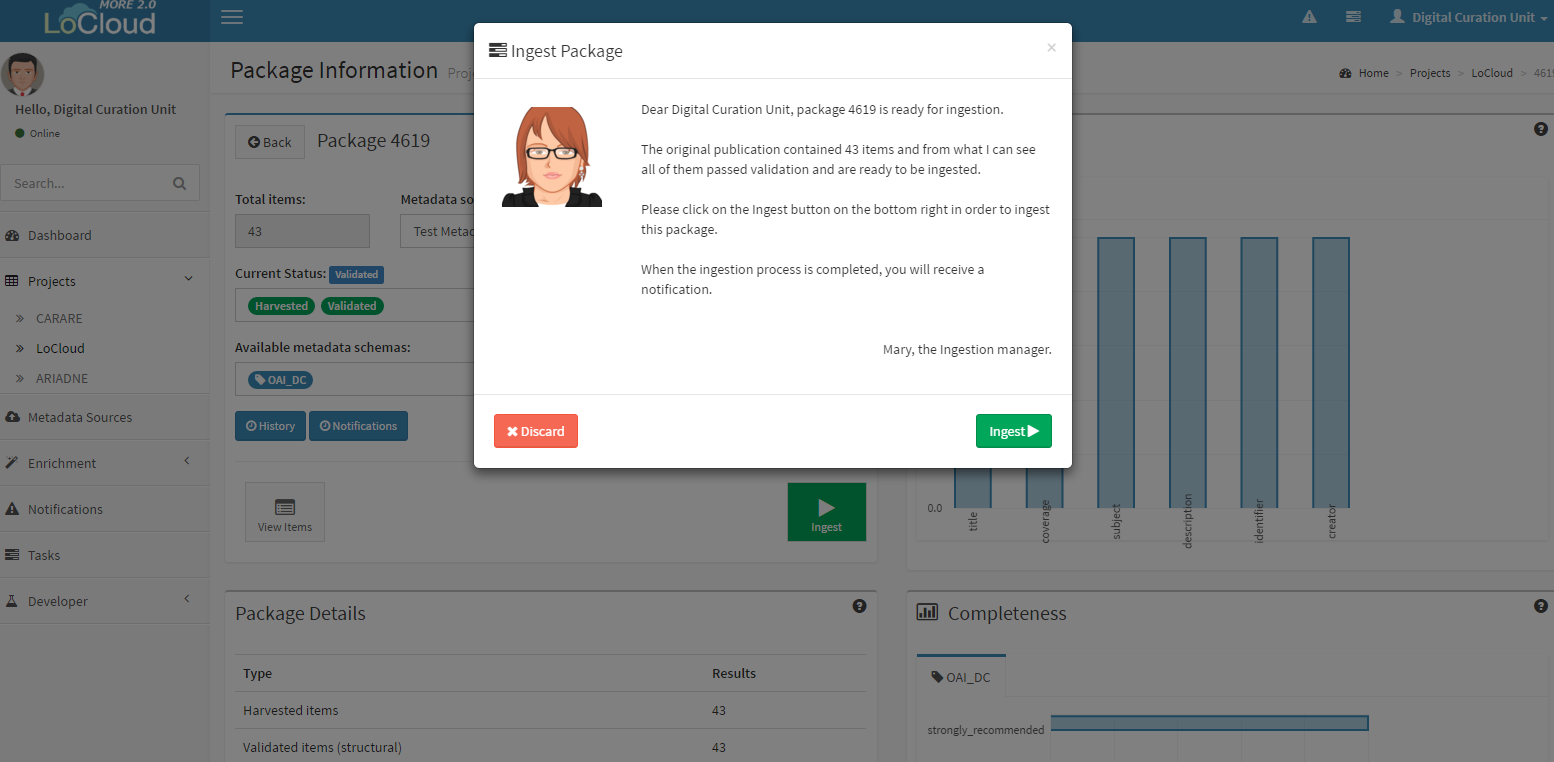
Provided that the harvest and the automatic validation are completed, you can proceed with the ingestion. You will be informed to ingest the package through the task assignment with a relevant message.
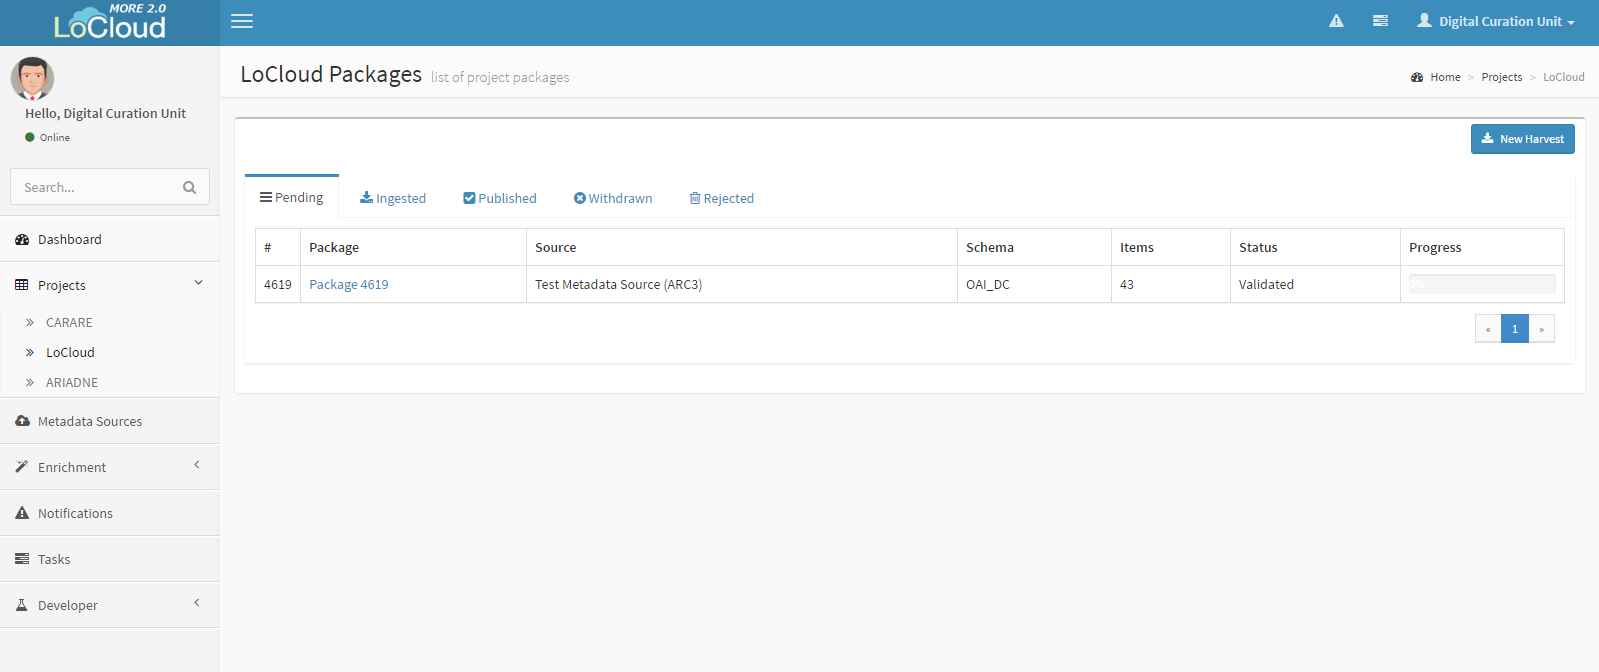
In the image above, you can notice that the status and the number of items have change from Harvesting to Validated and from 0 to 43 respectively (compare with last image in Section Harvest subsection Create a new harvest).
Ingest package
Ingest your package by simply selecting the "Ingest" button.
After Ingestion
If the native metadata schema is the same with the target one, you can either enrich or publish your package. On the other hand, if the native schema is different than the target schema then you have to transform your package.
Transform
General
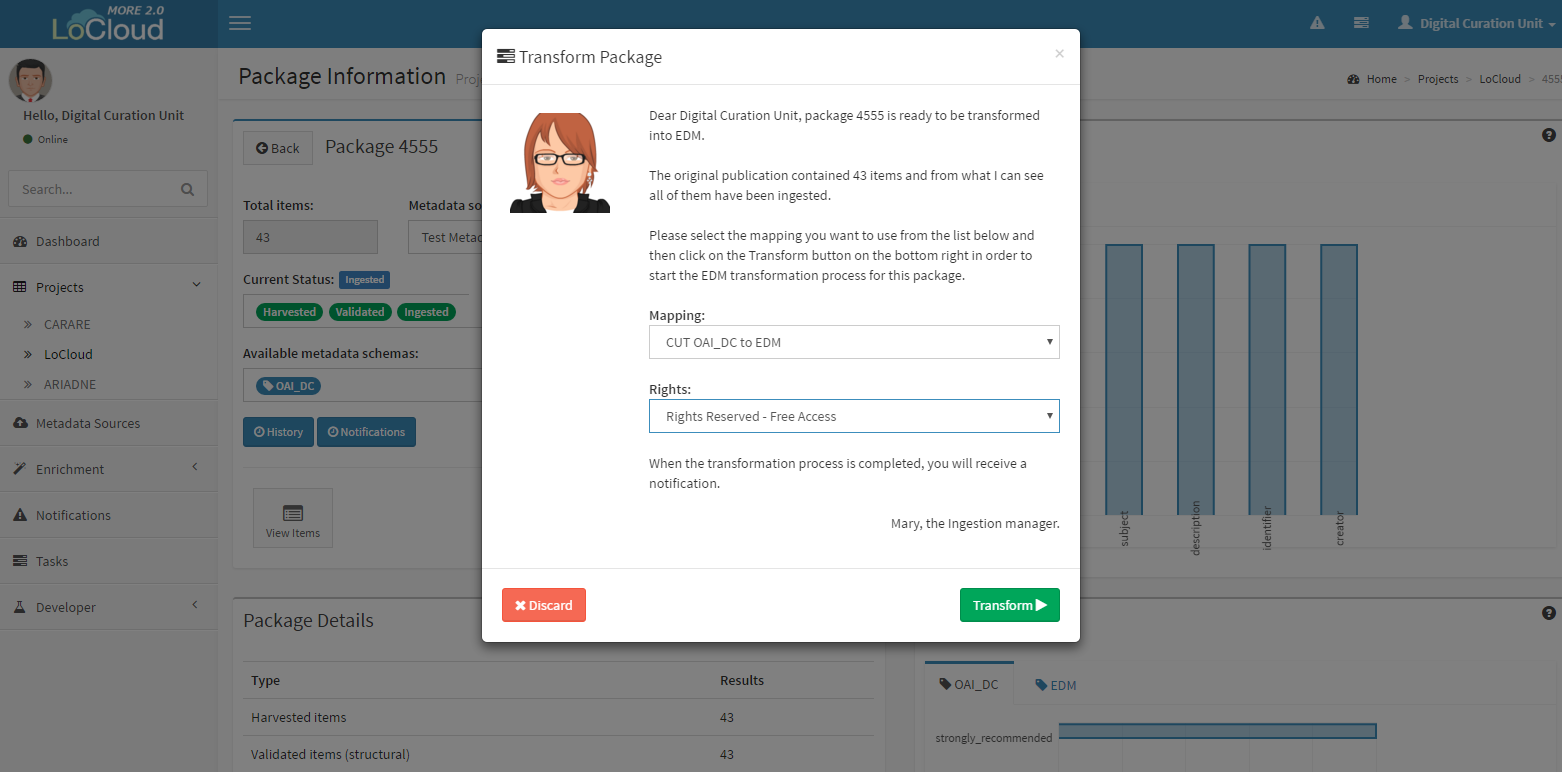
The package after the ingestion should be transformed to EDM provided that the schema used in the package is one of the intermediate schemas. In case that the native schema is EDM, this step is omitted. The task manager will inform you about the details of the transformation, from which EDM records of the package will be created. For the transformation process, you need to provide the following information:
- Mapping: choose the appropriate mapping by taking into account the native and target metadata schema. The mappings are predefined.
- Right Statement: the right statement is essential. If the right statement is not provide with your schema, you have to attach one.
Transform package
Transform your package by simply selecting the "Transform" button.
Once the transformation is over, we can see that the available metadata schemas are now two. Now for each item we have two metadata records, one in the native metadata schema (OAI_DC in our case) and a second one in EDM.
After Transformation
Once your package has been transformed, you can either proceed to its publication (if you want to publish the records in EDM) or its enrichment. Important note: If the transformation is terminated with errors, your package will most probably be rejected if you continue with its publication. Therefore, the wise thing to do is to try to overcome this problem with the help of the available enrichment services. Otherwise, you better return to your repository and try to correct those errors.
Enrichment
Create a new enrichment plan
From the menu on the left select the “Enrichment” tab and then from the dropdown list select “Enrichment Plans”.
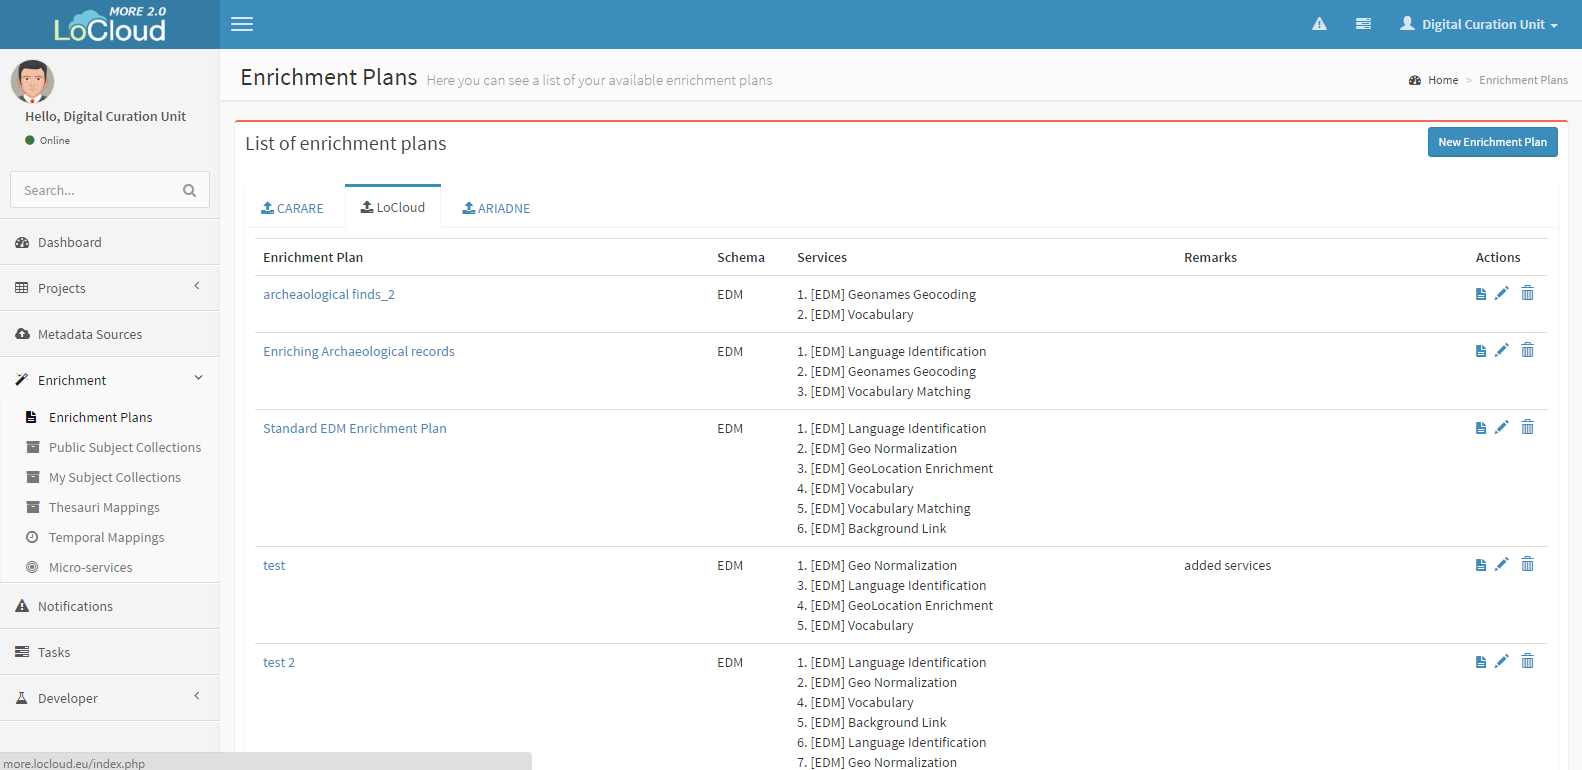
In each tab you can see the enrichment plans that were created for the respective project.
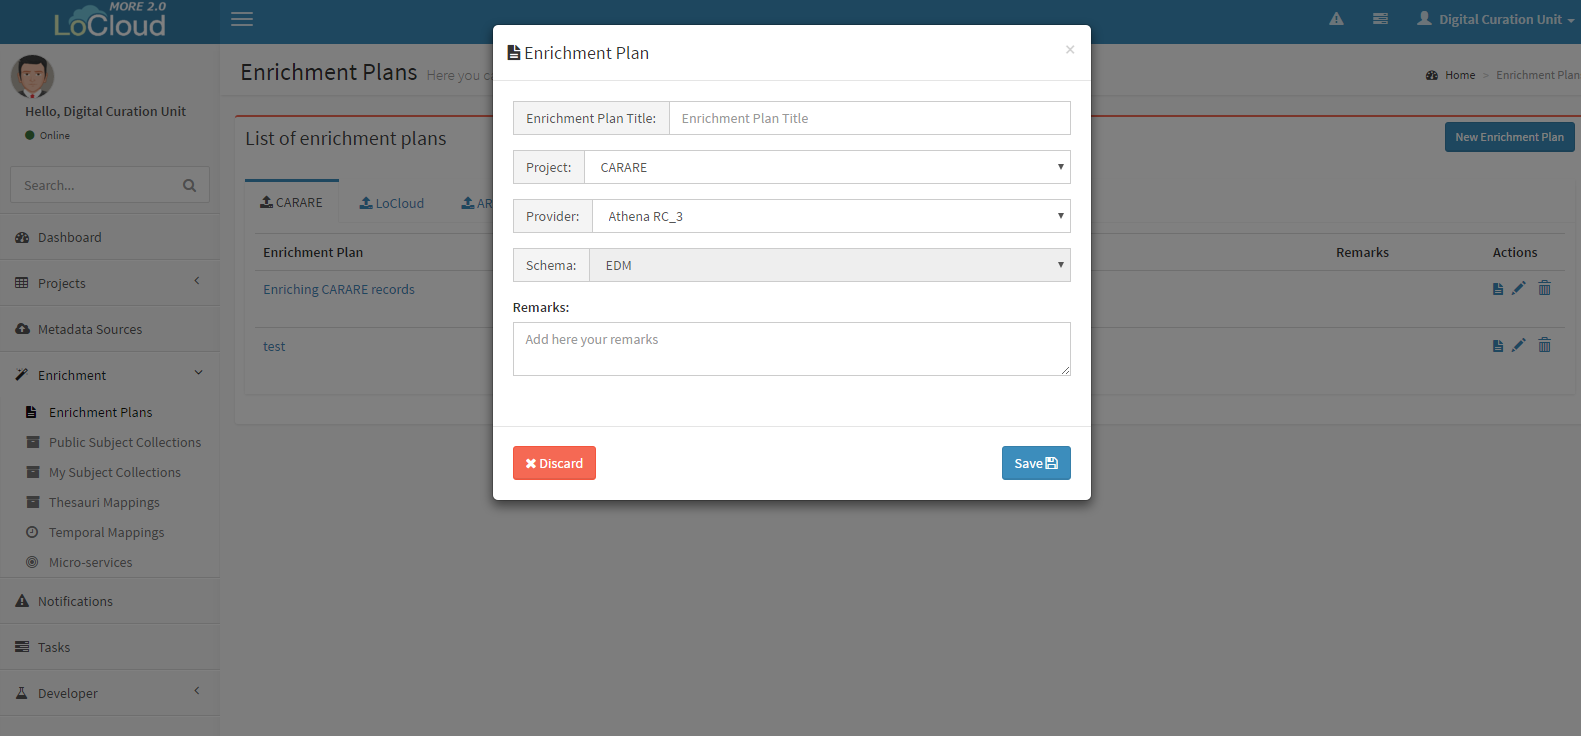
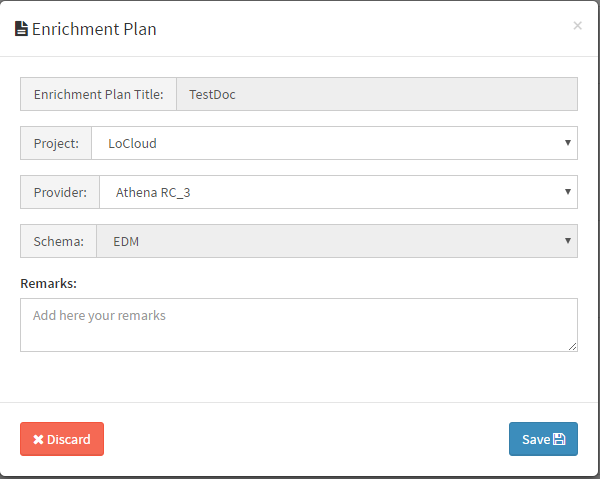
You can create a new enrichment plan by simply clicking on the "New Enrichment Plan" button and filling in the fields.
Edit an enrichment plan
To add some remarks and/ or change the project on your enrichment plan, select the file icon from the “Actions” column (last column).
On the other end of the spectrum, if you want to add and/ or delete some enrichment services in your enrichment plan, then select the pen icon from the “Actions” column (last column).
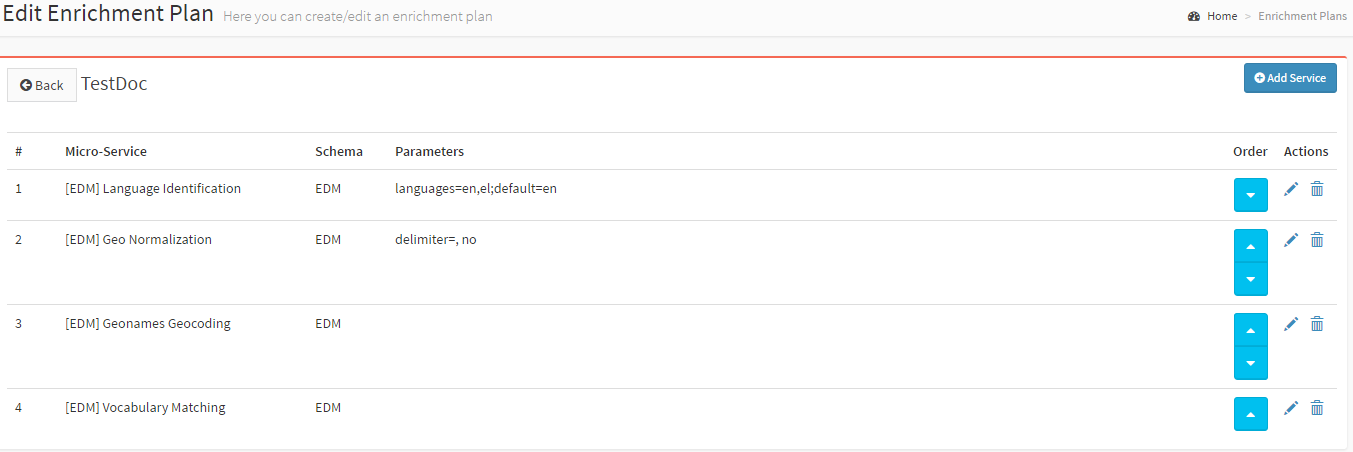
- Add Service: Press the "Add Service" button in the top right
- Delete Service: Select the button with the bin icon from the "Actions" column
- Edit Service: Select the button with the pen icon from the "Actions" column
- Change the order of service: Click the up and down arrow in the "Order" column, to change the order of the service
Important note: The first service (identifier 1) will be executed first, the second service will be executed second and so forth. The order of the services inside an enrichment plan is crucial. Inappropriate order will lead to non-functional plan. For instance Geo Normalization is not possible to be executed after Geonames Rev. Geocoding because the latter service requires the coordinates to have been normalized in an appropriate way in the class edm:Place.
A closer look at enrichment services
All the enrichment services are available to be used in EDM schema. For some services, parameters are needed to be added. More specifically:
- Geo Normalization service, which normalizes in an appropriate way the coordinates to the class edm:Place, takes as parameters the delimiter (, /, -, _) used to the records and the invert status (x instead of y, y instead of x).
- Vocabulary service, which allows users to create collections of thesauri terms and insert them automatically into all items of their aggregated packages, takes as parameter the subject Collection.
Create a Vocabulary Collection
Especially for the Vocabulary service,you have to create a Subject collection through the corresponding tab in the menu on the left.
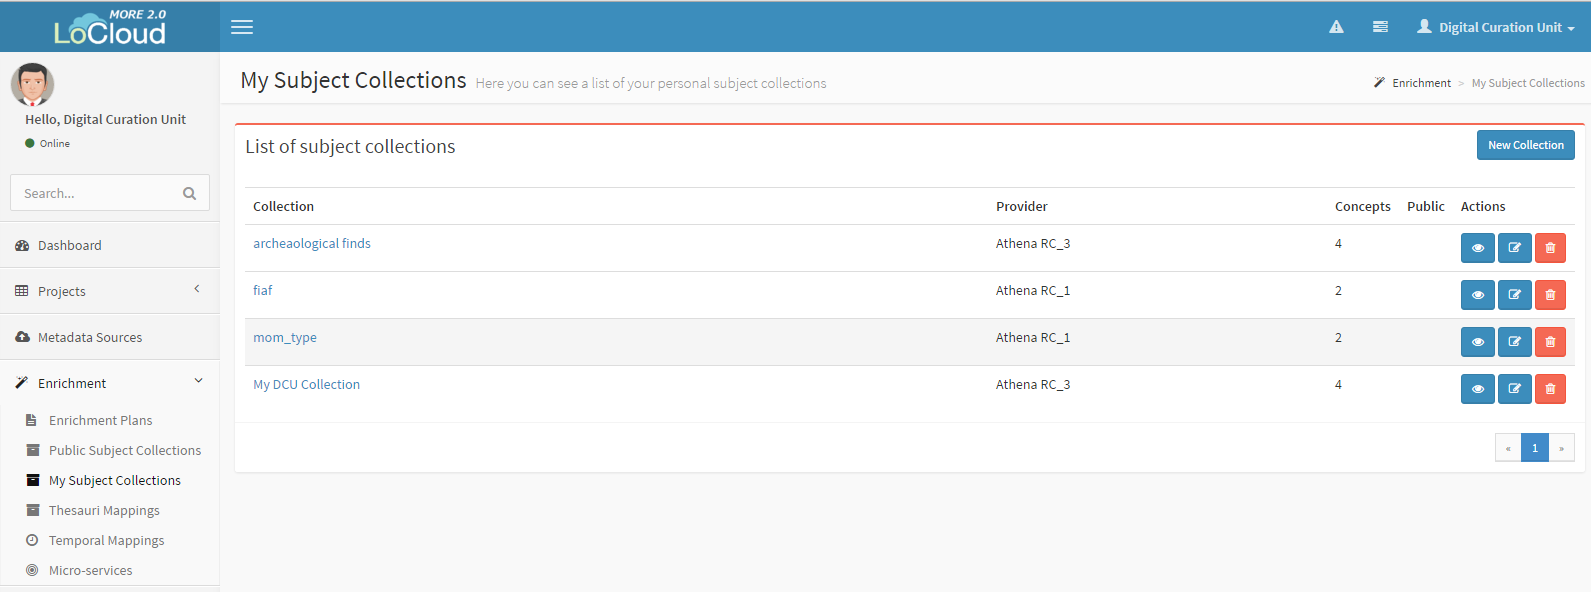
Click the "New Collection" button in order to create a new collection.
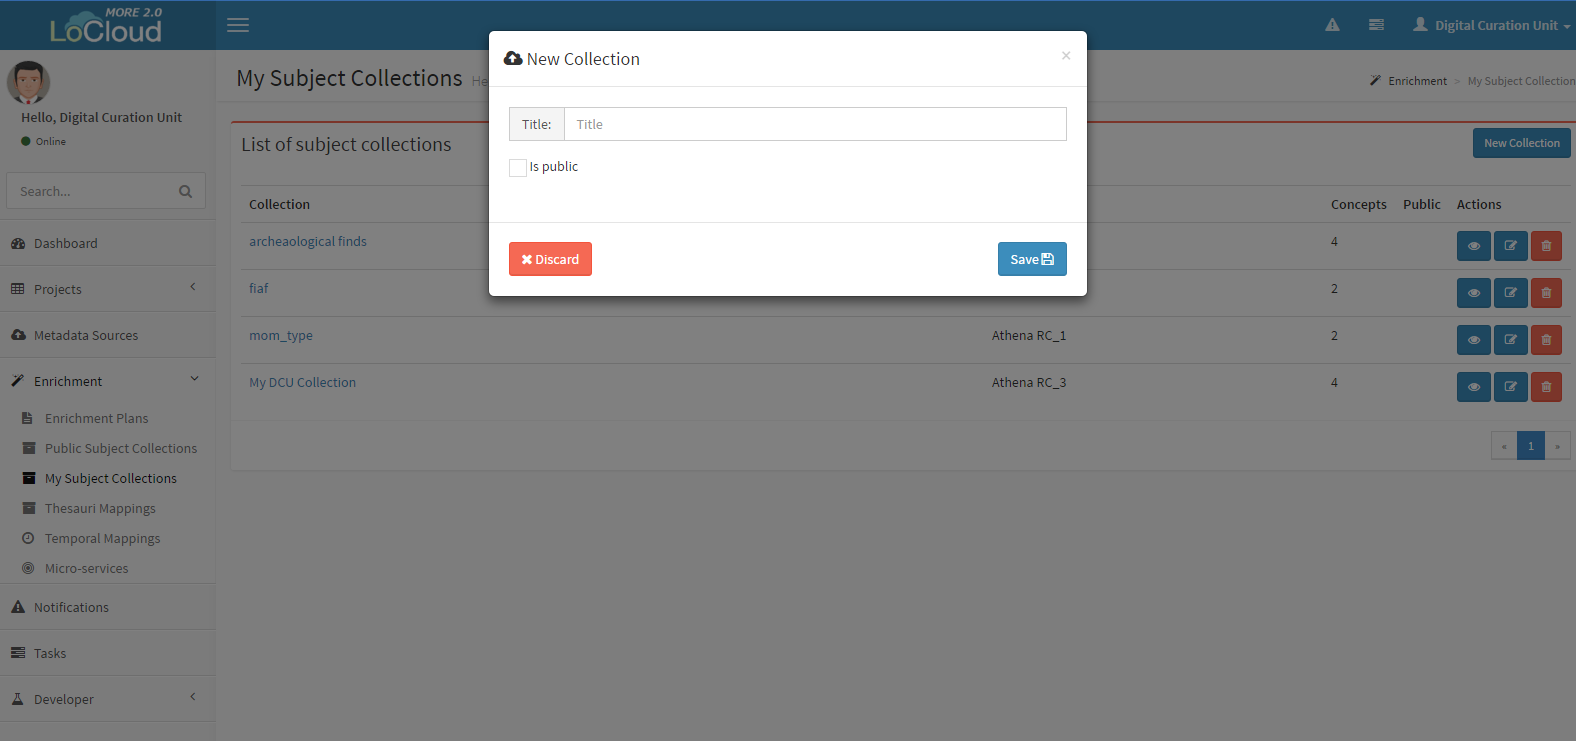
Click the button with the eye icon to add some concepts in your collection. You are able to choose among 27 vocabularies (Vocabulary service) the appropriate concepts so as their records to be enriched.
In general, all the services are integrated into the LoCloud aggregation environment through their APIs. The result of each microservice after enrichment phase is:
- The GeoLocation service adds coordinates and/or place names in the EDM record. More specifically, in the class edm:Place, the elements wgs84_pos:lat, wgs84_pos:long <wgs84_pos:lat> <wgs84_pos:long> and skos:prefLabel
- The Vocabulary service adds the selected subject to the records, through the element dc:subject in the class edm:providedCHO.
- The Vocabulary matching service matches the subject of the item with the appropriate thesauri of the list of the Vocabularies. This information is not depicted in the EDM record yet but the user can see it in the “Enrichment Details”.
- The Background link service matches the subject of the item with a subject of DBPedia. This information is not depicted in the EDM record yet but the user can see it in the “Enrichment Details”.
Important note: In the Enrichment micro-services control panel, you can get any information you want concerning the enrichment services. From the dropdown list that appears click on “Enrichment” tab in the left menu and then select “Micro-services”.
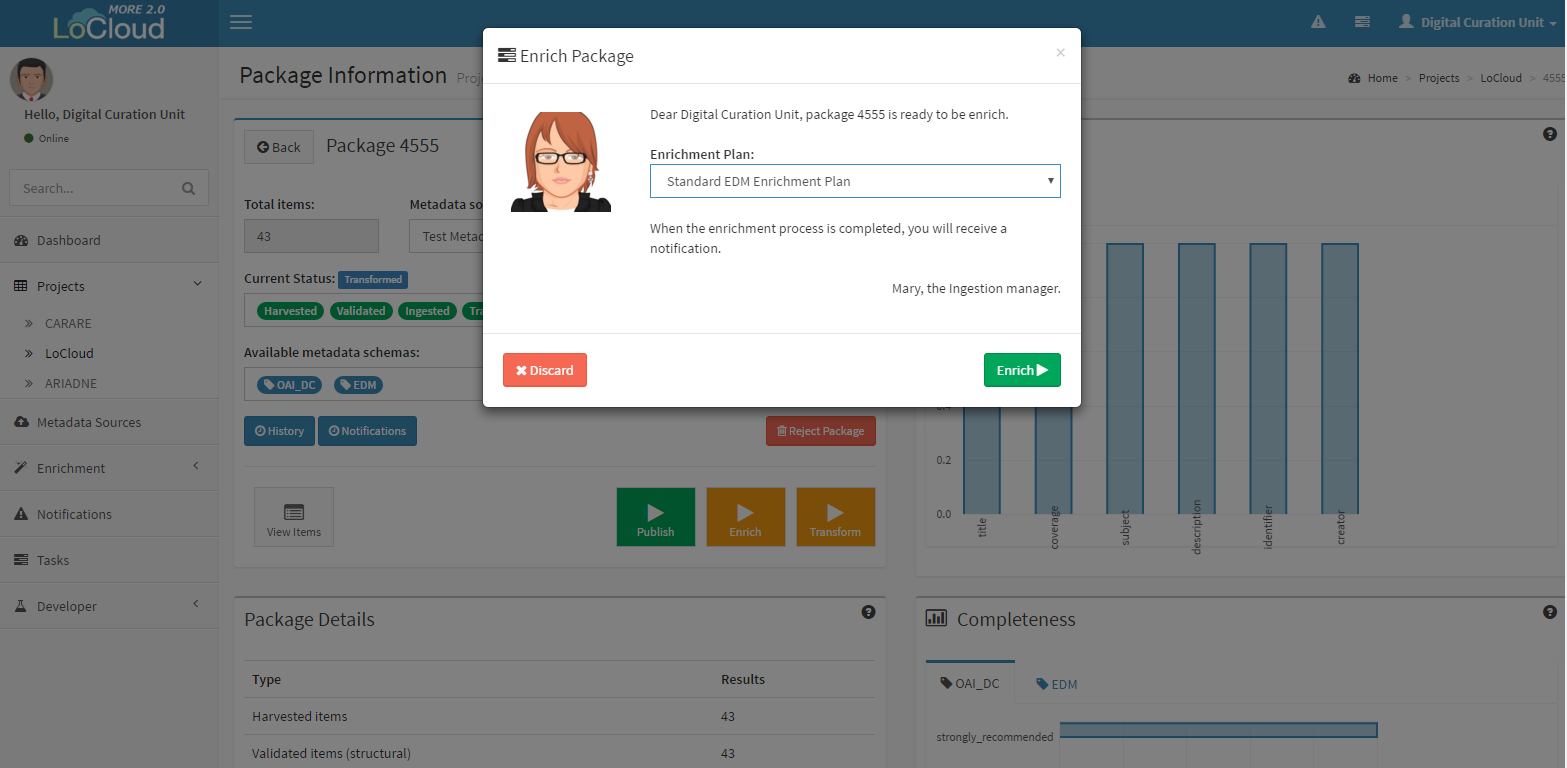
Enrich Package
Once you have your enrichment plan you can continue with the enrichment of your package. In the package control panel select the "Enrich" button and in the pop up panel select the appropriate plan.
After Enrichment
After enrichment, for each item in this package there one more record is added. Specifically, the new record is of eEDM schema. Currently, you can publish your package either in EDM or eEDM.
Publish
Publish
One more time, the task manager will assign this job. To proceed with the publication of your package just click on the “Publish” button. For the publication you have to select in which schema (EDM or enriched EDM) you wish to publish the records. Moreover, you will be given three different options:
- To publish the package to Europeana.
- To download the package as compressed TAR Archive.
- To do both.

After Publication
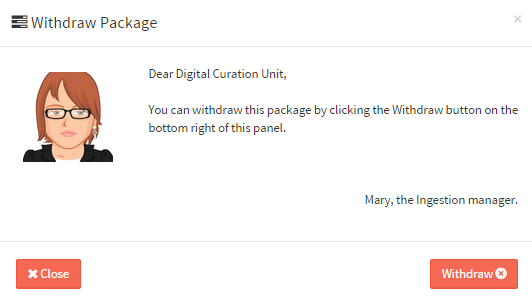
After publication, there are three possible actions:
- The package to be harvested by Europeana in its next harvest. Please note that this can take up to one month. Once the package is harvested the user will receive a notification. If Europeana rejects the package, the user will also receive an appropriate feedback explaining what led to the rejection.
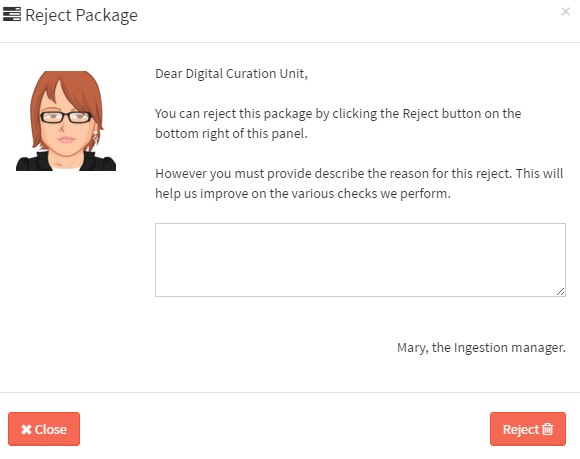
- To reject the package. However, the user must provide a short description for the reason of this rejection.
- To withdraw the package.